Preparing for your big day can be overwhelming, especially when it comes to makeup. Hiring a professional is common, but many brides today prefer doing their own makeup—either to save money or to ensure their look feels personal and authentic. If you’re a beginner but want to achieve a flawless bridal look, this step-by-step bridal makeup tutorial will guide you through every stage of the process.
With the right techniques and products, you can create a bridal makeup look that lasts all day, photographs beautifully, and enhances your natural features.
Why DIY Bridal Makeup?
Before jumping into the tutorial, here’s why many brides opt for DIY:
- Cost-effective: Saves hundreds on professional services
- Personal control: You decide your final look
- Trial-friendly: You can practice multiple times
- Product familiarity: Use items you know work for your skin
Essential Bridal Makeup Products
Here is a list of must-have makeup items for your bridal look:
| Product | Purpose |
|---|---|
| Primer | Smoothens skin and improves longevity |
| Foundation | Evens out complexion |
| Concealer | Covers dark circles and blemishes |
| Setting powder | Locks in base makeup |
| Eyebrow pencil/powder | Defines brows |
| Eyeshadow palette | Adds depth and color to eyelids |
| Eyeliner and mascara | Defines eyes and lashes |
| False lashes (optional) | Adds volume to lashes |
| Blush and bronzer | Adds color and warmth to the face |
| Highlighter | Enhances high points for a glow |
| Lip liner and lipstick | Defines and colors lips |
| Setting spray | Keeps makeup in place all day |
Step-by-Step Bridal Makeup Tutorial
Step 1: Prep Your Skin
Cleanse your face, apply toner, moisturize, and don’t forget sunscreen (at least SPF 30). Apply a hydrating primer to ensure makeup lasts through the ceremony, photos, and reception.
Tip: If your wedding is in a humid environment, opt for a mattifying primer.
Step 2: Apply Foundation
Choose a long-wearing, medium-to-full coverage foundation that matches your undertone. Apply using a damp beauty sponge or foundation brush for a flawless finish. Blend into the jawline and neck.
Step 3: Conceal Imperfections
Use a creamy concealer to cover dark under-eyes, redness, or blemishes. Apply a lighter shade under the eyes in a triangle shape to brighten the face.
Step 4: Set the Base
Apply translucent setting powder to lock in your base. Focus on areas prone to oiliness like the T-zone.
Step 5: Define Your Brows
Use a brow pencil or powder to shape and fill in your eyebrows. Your brows frame your face—don’t skip this step. Set with a clear or tinted brow gel.
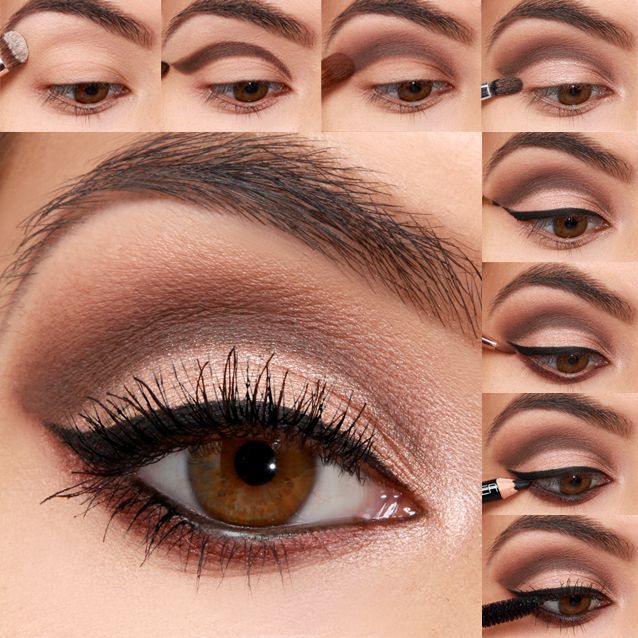
Step 6: Eye Makeup
- Transition shade in the crease
- Darker shade on the outer corner for depth
- Shimmer or metallic on the lid for bridal sparkle
- Highlight the brow bone and inner corner
- Line the upper lash line with waterproof eyeliner
Curl lashes and apply mascara. You can add natural-looking false lashes if you’re comfortable.
Step 7: Contour and Blush
Lightly contour your cheekbones, jawline, and nose with a matte bronzer. Add blush to the apples of your cheeks to give a youthful flush.
Pro Tip: Use cream products for a dewy finish and powder products for a matte look.
Step 8: Highlight for Radiance
Apply a subtle highlighter to the high points of your face: cheekbones, bridge of the nose, cupid’s bow, and brow bone.
Step 9: Perfect Your Lips
- Outline your lips with a long-wear lip liner.
- Fill with a long-lasting, hydrating lipstick.
- Blot and reapply for added longevity.
Choose a lip color that complements your overall look and skin tone—rose, nude pink, or classic red are timeless bridal shades.
Step 10: Lock It In
Finish with a setting spray to keep your makeup fresh for hours. If you’re prone to shine, use blotting papers throughout the day.
Bridal Makeup Timeline
| Timeline | What to Do |
|---|---|
| 1–2 months before | Finalize products, start practicing |
| 2–3 weeks before | Perform full trial with dress or outfit |
| 1 week before | Shape eyebrows, do any facials or treatments |
| 1 day before | Exfoliate and hydrate skin; drink plenty of water |
| On wedding day (morning) | Follow this makeup routine with time to spare |
Practical Beauty Tip During Wedding Prep
While makeup plays a huge role in your overall bridal look, healthy hair is just as important. During those stressful pre-wedding months, it’s common to face split ends and dryness due to heat styling or coloring. If you’re not planning a haircut before the big day, now is the time to learn How to Prevent Split Ends Without Cutting Hair to keep your locks healthy, shiny, and photo-ready.
FAQs About DIY Bridal Makeup
Q1: I’ve never done makeup before—can I really do my bridal makeup?
Absolutely. The key is practice. Give yourself enough time to test different looks and get comfortable with the products and tools.
Q2: How long does bridal makeup typically take?
It can take 1 to 2 hours, especially if you’re doing it yourself. Allocate plenty of time on your wedding day and avoid rushing.
Q3: Should I use cream or powder products?
Cream products offer a more natural, dewy finish and are great for dry skin. Powder products work better for oily skin and provide longer wear.
Q4: What kind of makeup lasts all day?
Look for long-wearing, waterproof, and transfer-proof formulas, especially for foundation, eyeliner, and lipstick.
Q5: Do I need to touch up during the day?
Yes. Keep a small kit with blotting paper, powder, lipstick, and concealer for minor touch-ups between events or photos.
Final Thoughts
Your wedding makeup should make you feel confident, beautiful, and like the best version of yourself. With this step-by-step bridal makeup tutorial, even beginners can achieve a polished and professional look. From glowy skin to perfectly defined eyes and lips, each step is designed to enhance your features without overwhelming them.
Just remember: practice makes perfect. Do a few full-face trials, take photos in different lighting, and make any necessary adjustments to your routine. And don’t forget to care for your skin and hair in the days leading up to your wedding—it’ll all come together to create a stunning look that lasts from “I do” to the final dance.