DIY Facial Treatments: The Ultimate Self-Care Ritual
DIY facial treatments are an effective way to care for your skin without booking an expensive spa appointment. With the right approach, you can achieve professional-quality results right from your own home.
Here’s a quick guide to DIY facial treatments:
- Cleanse twice (oil-based followed by water-based cleanser)
- Steam your face for 5-10 minutes to open pores
- Exfoliate gently with AHA/BHA product or scrub
- Apply a mask suited to your skin type
- Tone to rebalance pH levels
- Apply serum targeted to your skin concerns
- Massage with facial tools or fingertips
- Moisturize to lock in benefits
According to dermatologists, at-home facials should be performed no more than once per week to avoid irritating your skin. This frequency allows for proper cell turnover while maintaining your skin barrier.
As Jennifer Swisher, a professional aesthetician, notes: “Treating yourself to a facial is one of life’s little luxuries, and with spas closed or expensive, an at-home facial is the perfect alternative.”
Why try DIY facial treatments? Beyond the cost savings, they allow you to customize ingredients for your specific skin concerns, create a relaxing self-care ritual, and maintain skin health between professional treatments.
For sensitive skin or beginners, start with gentle ingredients like honey, yogurt, or aloe vera. More experienced users can incorporate active ingredients like fruit enzymes or gentle acids for improved results.

What a Facial Is & How Often to DIY
Think of a facial as a multi-step skin party where cleansing, exfoliating, and nourishing all come together in perfect harmony. While professional facials involve fancy equipment and the skilled hands of an esthetician, DIY facial treatments at home can still give your skin that “I just spent $200 at the spa” feeling—when done right.
Celebrity esthetician Joanna Czech puts it perfectly: “A facial is a spa treatment involving steps to cleanse, hydrate, moisturize, and relax the face, often custom to specific skin types or concerns.” The main difference? Professionals can go deeper with extractions and use stronger peels than we typically should at home.
When you treat yourself to regular DIY facial treatments, your skin thanks you with:
Improved blood circulation that creates that coveted natural glow
A deep clean that your daily face wash just can’t match
Better absorption of all those serums you’ve invested in
A delightful dose of stress reduction and relaxation
Faster cell turnover for fresher, newer skin
Science backs this up too! Research in the Journal of Cosmetic Science has shown that proper steaming during facials increases skin permeability, helping those expensive serums and treatments penetrate better. It’s like opening the door wider for all your skincare goodness to enter.
But how often should you indulge? A 2023 dermatologist consensus published in Real Simple recommends limiting DIY facial treatments to once weekly at most. Dr. Melissa Kanchanapoomi Levin, a board-certified dermatologist, explains why: “This frequency strikes the perfect balance. It allows for cellular renewal without compromising your skin barrier through over-exfoliation.”
Facial Benefits You’ll Notice First
The beauty of DIY facial treatments is that some benefits appear almost instantly, giving you that immediate gratification we all crave:
Hydration boost is usually the first thing you’ll notice. Your skin drinks up all that moisture, leaving it plump and dewy—like you’ve been religiously drinking your eight glasses of water (even if you haven’t).
Pore clarity improves as steam and proper cleansing work together to dislodge the gunk hiding in your pores. They won’t physically shrink, but they’ll certainly appear smaller and less noticeable.
Radiance happens fast, as celebrity facialist Renée Rouleau notes: “The gentle exfoliation and increased circulation from massage gives skin an immediate glow that can last for days.” It’s that lit-from-within look that has friends asking what you’ve done differently.
According to a consumer study by No7 Beauty, participants spotted smoother and firmer skin after just one week of consistent facial routines. This quick visual payoff is what makes DIY facial treatments so satisfying as a self-care ritual—you put in the time, and your mirror shows the results.
Essential Gear & Products for DIY Facial Treatments
Creating your own spa-worthy experience at home doesn’t require a beauty store shopping spree, but having a few quality basics will definitely lift your DIY facial treatments. Think of this as building your personal facial toolkit—you can start small and add pieces as you go!

Your facial trip begins with a few essential tools. Soft microfiber washcloths will be much kinder to your skin than regular towels when removing products. If you’re feeling fancy, a facial steamer can give you that professional-level pore opening experience, though a bowl of hot water works beautifully too! For facial massage, a jade roller or gua sha tool helps with lymphatic drainage and product absorption. Don’t forget a simple headband to keep your hair out of the mix, and some small bowls for mixing custom treatments.
Product-wise, start with the basics. A good cleansing balm or oil melts away makeup and sunscreen in that crucial first cleanse. Follow with a gel or foam cleanser that suits your skin type to remove any remaining impurities. For exfoliation, choose either a chemical option with AHAs/BHAs or a gentle physical scrub—never both at once!
“The quality of your tools matters,” says esthetician Stevie McCord. “Invest in washable, reusable items rather than disposables when possible—it’s better for both your skin and the environment.”
Round out your collection with targeted face masks, a balancing toner, treatment serums for specific concerns, a nourishing moisturizer, and always—always—SPF for daytime after treatments when your skin is more sensitive to sunlight.
Before introducing any new product into your DIY facial treatments, do a quick patch test behind your ear to check for potential reactions. This is especially important if you have sensitive skin that tends to rebel against new ingredients!
Budget-Friendly Swaps & Kitchen Staples
Your kitchen might be hiding some of the best skincare ingredients around! These natural alternatives can save you money while still delivering impressive results in your DIY facial treatments.
For cleansing, try a soothing oat milk cleanser by blending two tablespoons of oats with a tablespoon of powdered milk and enough water to create a paste. This gentle mixture cleanses while calming irritated skin.
When it comes to masks, nothing beats raw honey as a natural antibacterial and hydrating treatment. Simply apply a thin layer to clean skin and let sit for 15-20 minutes. For deeper hydration, mash half an avocado with grated cucumber. Pumpkin enthusiasts will love combining two tablespoons of pumpkin puree with a teaspoon each of honey and cream for what Kate Somerville calls “natural enzymes and vitamin A to brighten skin and reduce fine lines.”
Improve your steaming experience by adding green tea bags to your hot water for an antioxidant boost, or sprinkle in some dried lavender or rosemary for a calming aromatherapy session.
“Some of the most effective skincare ingredients can be found right in your kitchen,” explains celebrity facialist Joanna Vargas. “The enzymes in papaya and pineapple, for example, are natural exfoliants similar to those in expensive peels.”
These wallet-friendly alternatives make DIY facial treatments accessible to everyone, proving that self-care doesn’t have to come with a hefty price tag. For more ideas on natural ingredients you can incorporate, check out DIY Skincare Ingredients for a comprehensive guide to what works best for different skin concerns.
Step-By-Step DIY Facial Treatments Routine
Now that you understand the benefits and have gathered your supplies, let’s walk through a comprehensive DIY facial treatment routine. Set aside about 45-60 minutes for the full experience.
Before beginning, remember these safety tips:
– Remove contact lenses before steaming
– Avoid using multiple active ingredients in one session
– If you have skin conditions like rosacea or eczema, skip the steam step
– Never leave exfoliating products on longer than recommended
| Exfoliation Type | Best For | Examples | Frequency |
|---|---|---|---|
| Chemical (AHAs) | Dry, sun-damaged skin | Glycolic acid, lactic acid | 1-2x weekly for dry skin |
| Chemical (BHAs) | Oily, acne-prone skin | Salicylic acid | 2-3x weekly for oily skin |
| Physical | Normal, combination skin | Gentle scrubs, enzyme powders | 1-2x weekly |
| Enzyme | Sensitive skin | Papaya, pineapple enzymes | 1x weekly |
Now, let’s break down each step of your DIY facial treatment in detail.
1. Set the Mood Like a Spa
Creating the perfect atmosphere is truly the foundation of an exceptional DIY facial treatment. This step might seem purely aesthetic, but it actually helps your mind transition from the chaos of daily life into a peaceful state where both skin and soul can refresh.
“Rarely does anyone’s bathroom have seashore background noise,” celebrity esthetician Joanna Czech playfully points out. “But creating an ambient, spa-like atmosphere improves both relaxation and the effectiveness of the facial.”
Think about how you feel when you walk into a professional spa—that immediate sense of calm washes over you before anyone has even touched your skin. You can recreate this feeling at home with just a few simple touches.
Start by dimming the lights or lighting a few candles around your bathroom. The soft, warm glow instantly signals to your brain that it’s time to unwind. If you’re worried about safety, LED candles create the same ambiance without any fire risk.
Next, consider the soundtrack to your self-care session. While traditional spa music works for many, Czech has a refreshingly personal take: “I don’t play raindrops when it comes to spa music—I prefer Pink Floyd or Dolly Parton. Choose what relaxes you personally.” Whether it’s classical tunes, nature sounds, or your favorite mellow playlist, the right audio backdrop improves your experience.
Scent plays a powerful role in setting the mood too. An essential oil diffuser with lavender, eucalyptus, or chamomile can transform your bathroom into an aromatic sanctuary. Just remember the golden rule of aromatherapy: always dilute essential oils in a carrier oil before they come anywhere near your skin.
Don’t underestimate the importance of physical comfort during your DIY facial treatment. Wear soft, loose clothing and have a cozy robe waiting for afterward. Some people even warm their towels on a radiator or in the dryer for that extra touch of luxury.
“Pour yourself a cold glass of cucumber water to sip while masking,” suggests beauty editor Karina Hoshikawa. This simple hydration step not only feels indulgent but also supports your skin from the inside out. Herbal tea works beautifully too, especially calming varieties like chamomile or peppermint.
Before you begin applying products, take a moment for mindful breathing. Close your eyes, inhale deeply through your nose for a count of four, hold for a moment, then exhale slowly through your mouth. Just three or four of these breaths can center your mind and deepen your relaxation.
By investing just five minutes in creating this sensory experience, you lift a simple skincare routine into a transformative DIY facial treatment that nourishes both your complexion and your mental wellbeing. This holistic approach is what makes at-home facials so much more than just product application—it’s self-care in its truest form.
2. Double Cleansing in DIY Facial Treatments
The foundation of any effective DIY facial treatment begins with double cleansing—a two-step process that leaves your skin truly clean and ready to receive all the goodness that follows.
Think of double cleansing as preparing a canvas before painting a masterpiece. As esthetician Jennifer Swisher explains, “The first cleanse dissolves surface impurities like oil and makeup; the second ensures every trace of dirt is removed.”
Step 1: Oil-Based Cleanser
Start with something that can break down makeup, sunscreen, and your skin’s natural oils—typically an oil-based cleanser or cleansing balm. Apply it to dry skin (yes, dry!) and take a full minute to massage it in using gentle circular motions.
During this massage, don’t forget those sneaky spots where product loves to hide. Your hairline, the crevices around your nose, your jawline, ears, and even your neck and décolletage deserve attention.
“These areas are common hiding spots for makeup residue and buildup,” Swisher points out. “A 60-second facial massage during oil cleansing improves relaxation and pore cleansing.”
I love the Sephora gentle balm for this step—it melts away everything without stripping your skin.
Step 2: Water-Based Cleanser
After rinsing away the first cleanser, follow up with a water-based option that suits your skin type:
If you have oily skin, reach for a gel or foam cleanser that leaves you feeling fresh.
For dry skin, a cream or lotion cleanser will cleanse without that tight, uncomfortable feeling.
Those with sensitive skin should opt for gentle, fragrance-free formulations that won’t trigger irritation.
Always rinse with lukewarm water—hot water might feel nice, but it can strip away natural oils your skin needs. Pat your face dry with a clean microfiber cloth instead of rubbing, which can irritate delicate facial skin.
“Using a microfiber washcloth to gently lift cleanser and makeup residue without stripping skin is a game-changer,” says Swisher.
If your skin feels tight or “squeaky clean” after washing, that’s actually a warning sign. Celebrity esthetician Renée Rouleau cautions, “If your skin feels tight after cleansing, your cleanser is too harsh.”
For those with ultra-sensitive skin, you might want to take an even gentler approach to this step in your DIY facial treatment. Consider using a milky cleanser or even oat milk as a natural alternative that soothes while it cleans.
With your face truly clean—not just surface clean—you’re now perfectly prepped for the next steps of your at-home facial journey.
3. Smart Exfoliation
Exfoliation is where the magic happens in your DIY facial treatments. Think of it as hitting the refresh button for your skin – sweeping away dead cells so your face can truly shine.
“Exfoliation stimulates cellular renewal and improves skin texture,” explains dermatologist Dr. Whitney Bowe. “But over-exfoliation is one of the most common skincare mistakes I see.”
You’ve got two paths to smoother skin – let’s explore both:
Chemical Exfoliation
These products do the work for you with acids or enzymes that dissolve dead skin cells:
Alpha Hydroxy Acids (AHAs) like glycolic and lactic acids are your go-to for brightening and smoothing the skin’s surface. If you’re dealing with dryness or sun damage, these are your friends.
Beta Hydroxy Acids (BHAs) – particularly salicylic acid – dive deeper into oily pores. Your acne-prone areas will thank you for this one.
Polyhydroxy Acids (PHAs) are the gentle giants of the acid world. Their larger molecules don’t penetrate as deeply, making them perfect for sensitive souls.
Enzyme exfoliants derived from fruits like papaya and pineapple offer a natural approach to dissolving dead skin cells without any harsh scrubbing.
Physical Exfoliation
Sometimes a hands-on approach feels most satisfying:
Enzyme powders transform with water into a gentle scrub that feels luxurious as you massage it in.
Gentle scrubs with rounded particles give you that satisfying scrubby feeling without tearing your skin (please avoid anything with walnut shells or fruit pits!).
“Face scrubs can scratch skin and potentially increase breakouts,” cautions skincare expert Joanna Vargas. “Chemical exfoliants often provide more consistent results without the risk of micro-tears.”
How often should you exfoliate? It depends on your unique skin:
If you have oily skin, you can likely handle exfoliation 2-3 times weekly. Those with normal or combination skin should aim for 1-2 times weekly. For the dry and sensitive among us, once weekly is plenty – maybe even less. Acne-prone skin benefits from BHAs 2-3 times weekly, while mature skin loves AHAs 1-2 times weekly to encourage cell turnover.
Always apply your exfoliant to damp skin and follow the instructions – most need just 1-5 minutes to work their magic. Never leave them on longer, and always rinse thoroughly with lukewarm water.
“Limit chemical exfoliants to one product per routine to avoid barrier damage,” advises dermatologist Dr. Shereene Idriss. This is especially important for maintaining skin health between your weekly DIY facial treatments.
Want to explore natural options? Check out these DIY Face Masks that incorporate gentle exfoliating ingredients you might already have at home.
Exfoliation isn’t about scrubbing harder – it’s about working smarter. Your skin is a delicate ecosystem that deserves gentle care, even as you slough away the old to reveal the glow underneath.
4. Safe Steam & Warm Compress
Steaming is where your DIY facial treatment starts to feel truly spa-like. This deliciously relaxing step softens your skin, opens your pores, and helps all those good ingredients in your later steps sink in deeper.

“Steaming opens pores and increases blood flow, making extractions easier and hydrating skin,” explains esthetician Shani Darden. “But there’s a fine line between beneficial steaming and overheating your skin.”
Think of steaming as prepping your skin to receive all the goodness that follows. It’s like warming up before exercise – necessary, but you don’t want to overdo it!
Professional Steamer Method:
If you’ve invested in a facial steamer (lucky you!), here’s how to use it safely:
Fill it with distilled water – tap water can leave mineral deposits in your machine over time. Position your face about 8-12 inches away from the steam (about the length of your forearm). Close your eyes, breathe normally, and enjoy the warm mist for 5 minutes max.
Bowl-and-Towel Method:
Don’t have a fancy steamer? No problem! This old-school method works just as well:
Boil some water, then let it cool for a minute (we want warm steam, not a facial burn!). Pour it into a large bowl and place it on a stable surface. Add a few drops of essential oil or some dried herbs if you’re feeling fancy. Position your face about 12 inches above the bowl and drape a towel over your head to create a little steam tent. Enjoy for 5 minutes, taking breaks if you feel too warm.
“You can actually use shower steam to soften skin if you don’t own a facial steamer,” suggests beauty editor Jessica DeFino. “Just perform your facial routine after a hot shower while pores are still open.”
Keep It Safe:
The most important rule with steaming in your DIY facial treatments is the 5-minute cap. Research shows that’s the sweet spot for getting benefits without damaging your skin. Always keep that 8-12 inch distance rule to prevent burns or irritation.
If you have rosacea, severe acne, or extremely sensitive skin, you might want to skip steaming altogether or replace it with a warm (not hot) washcloth compress instead.
“Steam dilates pores and increases blood flow,” notes Joanna Czech. “But never leave skin bare after steaming – apply your next products promptly to prevent moisture loss and tightness.”
Once you’ve finished steaming, gently pat your face with a clean towel and move immediately to your next step. Your warmed, receptive skin is now perfectly prepped to soak up all the nourishing treatments that follow.
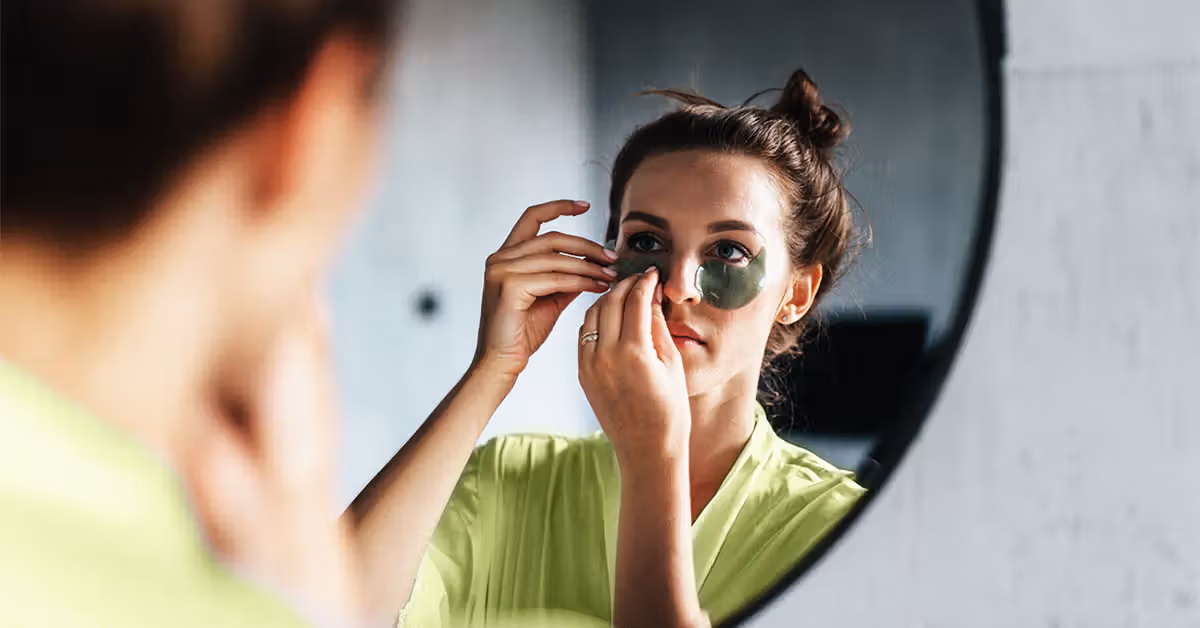
5. Masking in DIY Facial Treatments
The mask step is where your DIY facial treatment truly becomes your own personal spa experience. Think of masks as concentrated skin therapy, delivering powerful ingredients exactly where you need them most.
“Your skin isn’t the same all over your face, so why use just one mask?” says celebrity facialist Joanna Vargas. “I always recommend choosing masks based on what your skin is telling you it needs today, not just what you used last time.”
Choosing the Right Mask:
Clay masks work like magnets for impurities, drawing out excess oil and unclogging pores. They’re perfect for your oily T-zone or when your skin feels congested. Just remember what Renée Rouleau wisely points out: “If your clay mask is cracking into tiny pieces, it’s pulling too much moisture from your skin—you need something gentler.”
Gel masks feel like a cool drink of water for irritated or sensitive skin. They calm redness and provide lightweight hydration without that heavy feeling that some masks leave behind.
Cream masks are like cozy blankets for dry, thirsty skin. Rich in nourishing oils and butters, they’re ideal when your skin feels tight or flaky, especially during winter months or after too much sun.
Sheet masks might look a bit scary (perfect for frightening your roommates!), but they’re amazing hydration boosters. The sheet prevents the serum from evaporating, forcing those good ingredients to sink into your skin instead.
Exfoliating masks with gentle acids can brighten dull skin, but use them sparingly in your DIY facial treatments and never combine them with other exfoliating products in the same session.
Multi-Masking Magic:
One of my favorite professional techniques you can easily do at home is multi-masking. “Think of your face as different neighborhoods with different needs,” explains esthetician Shani Darden.
Try applying:
– A clay mask on your oily T-zone to absorb excess oil
– A hydrating gel mask on dry cheeks for moisture
– A brightening mask on areas with sun spots or pigmentation
This targeted approach gives each area exactly what it needs without compromising other parts of your face.
Application Tips That Make a Difference:
Always apply masks to clean, slightly damp skin—this helps them spread more evenly and prevents them from absorbing too quickly. A clean foundation brush gives you that professional-level application and keeps your fingers clean.
Timing matters tremendously with masks. More is definitely not better! Follow the instructions carefully, and with clay masks, remove them while they’re still slightly damp. Once they’ve completely dried, they start pulling moisture from your skin instead of just impurities.
A warm, damp microfiber cloth makes removal gentle and effective. Use light circular motions to wipe away the mask, which adds a touch of physical exfoliation as a bonus.
Kitchen-to-Face DIY Mask Recipes:
For a truly personalized DIY facial treatment, your kitchen likely contains everything you need:
When your skin needs moisture, try mashing half a ripe avocado with a tablespoon each of honey and plain yogurt. The healthy fats in avocado restore your skin barrier while honey attracts moisture and yogurt gently exfoliates. Apply for 15-20 minutes before rinsing.
For brightness and glow, “pumpkin is nature’s retinol alternative,” notes Kate Somerville. Mix two tablespoons of pumpkin puree with a teaspoon each of honey and cream. The natural enzymes and vitamin A help brighten skin and soften fine lines in just 10 minutes.
When skin feels irritated, a simple oatmeal mask can work wonders. Combine two tablespoons of ground oats with a tablespoon of honey and enough water to form a paste. The oats soothe inflammation while honey provides antibacterial benefits.
Whatever mask you choose for your DIY facial treatment, moderation is key. Most masks need just 10-20 minutes to work their magic, and letting them sit longer rarely improves results. Your skin will thank you for this pampering pause in your busy week.
6. Tone, Treat & Boost
After your mask comes off, your skin is like a sponge – ready to soak up all the goodness you’re about to apply. This phase of your DIY facial treatment is where the magic happens, as you balance your skin and deliver powerful ingredients that target your specific concerns.
Toning:
Think of toning as hitting the reset button on your skin’s natural balance. “Different mask types can disrupt your skin’s natural pH,” explains dermatologist Dr. Hadley King. “A good toner brings everything back to equilibrium.”
Your skin type should guide your toner choice. If you’re dealing with dryness, reach for hydrating formulas with glycerin or hyaluronic acid. Combination skin? Try balancing ingredients like alcohol-free witch hazel or soothing rose water. Those with oily or acne-prone skin might benefit from very gentle exfoliating toners – just be careful not to overdo it if you’ve already exfoliated earlier.
The application makes a difference too. Rather than rubbing (which can irritate skin), try gently pressing a toner-soaked cotton pad onto your face. If you’re using a mist formula, simply close your eyes and spritz – it feels heavenly and adds a spa-like touch to your home facial experience.
Treatment Serums:
Now comes the part where you really customize your DIY facial treatment – applying serums that address your unique skin concerns.
“Think of serums as your skin’s personal problem-solvers,” says esthetician Renée Rouleau. “They deliver concentrated active ingredients exactly where you need them.”
If brightening is your goal, vitamin C is your friend. For those pesky enlarged pores and uneven tone, niacinamide works wonders. Need moisture? Nothing beats hyaluronic acid for deep hydration and that plump, dewy look. Peptides help firm and support collagen production, while salicylic acid tackles acne and excess oil.
Just remember Rouleau’s wise advice: “Avoid applying acids or retinols immediately after exfoliation.” Your skin needs a chance to recover between intense treatments, so if you’ve already exfoliated, skip the retinol for today.
Application Technique:
The way you apply these potent products matters almost as much as the products themselves. Start by warming 2-3 drops of serum between your fingertips. Then, gently press and pat the product into your skin rather than rubbing vigorously.
“Pressing products into skin rather than rubbing allows for better penetration,” explains celebrity facialist Joanna Czech. This gentle approach helps your skin absorb all those beautiful ingredients while also feeling incredibly soothing.
Give each layer about 30-60 seconds to sink in before applying the next – patience pays off here! If you have specific trouble spots, don’t be afraid to add an extra drop to those areas.
For an extra boost that feels incredibly luxurious, consider adding an essence to your routine – these lightweight, hydrating liquids prepare your skin to better absorb everything that follows. Apply it after toning but before your serum, and you’ll notice your skin drinks up your serums even more effectively.
This mindful approach to the treatment phase of your DIY facial treatment transforms it from a simple skincare routine into a truly therapeutic experience. Your skin will thank you with that coveted “I just left the spa” glow.
7. Facial Massage & Tools
There’s something almost magical about facial massage that transforms your DIY facial treatment from a simple skincare routine into a truly therapeutic experience. Not only does it feel incredible, but it delivers real benefits too.
“Facial massage is not only pleasant but also boosts skin energy and de-puffs the face,” explains esthetician Joanna Czech with her characteristic warmth. “It’s optional but worth it for circulation and lymphatic drainage.”

Manual Massage Techniques:
Let’s start with what you already have—your hands! Your fingertips can work wonders with these simple techniques:
Lymphatic drainage uses gentle, sweeping motions upward and outward to reduce morning puffiness. Think of it as helping your face “drain” excess fluid. Start at the center of your face and use feather-light pressure (the lymphatic vessels are just beneath your skin) as you move toward the lymph nodes near your ears.
For circulation-boosting, use slightly firmer pressure with upward strokes. Work from your jawline up to your cheekbones, then from the center of your forehead outward. This gentle lifting motion helps bring fresh blood flow to your skin—hello, natural glow!
When tension has your face feeling tight (we’ve all been there!), focus on pressure points around your temples, between your eyebrows, and along your jaw joints. Use small circular motions with your middle fingers to release that built-up stress.
Facial Tools:
While your hands are wonderful tools, adding a few simple implements to your DIY facial treatment can level up your massage game considerably.
Jade rollers are dual-ended stone rollers that naturally cool and depuff the skin. Use the larger end for broader areas like your cheeks and forehead, and the smaller end for delicate areas around your eyes and nose. Pro tip: store yours in the refrigerator for an extra refreshing treatment on tired mornings!
Gua sha tools are flat stones designed for sculpting and tension release. Hold yours at a slight 15° angle against your skin and apply gentle to medium pressure as you sweep upward and outward. Always pair with a facial oil to create the perfect glide—nobody wants tugging on delicate facial skin.
Facial cups create gentle suction to stimulate circulation. The key here is to keep them moving constantly to avoid leaving marks. Use extremely gentle suction around your eye area—this delicate skin deserves extra care.
For tech lovers, microcurrent devices deliver low-level electrical current to “train” your facial muscles, almost like a gym workout for your face. Always use with a conductive gel, and start with just 5 minutes before gradually increasing your time.
“Use fingers or tools (jade roller, gua sha) with facial oil, working from the middle out and upward, finishing with eye cream,” advises skincare expert Kate Somerville, summarizing the essentials beautifully.
Best Practices:
To get the most from your facial massage, remember these friendly tips:
Always apply oil or serum before using tools—this creates slip and prevents pulling on your skin. Clean your tools after each use with mild soap and water (bacteria has no place in your DIY facial treatment!).
Begin with light pressure and increase gradually as your skin adjusts. Even just 3-5 minutes of massage delivers noticeable benefits, though you can certainly enjoy longer sessions when time allows.
“Facial massage promotes a healthy-looking glow,” notes esthetician Shani Darden with enthusiasm. “Even just 3 minutes can make a visible difference in puffiness and radiance.”
For an extra treat, store your stone tools in the refrigerator. That cooling sensation not only feels heavenly but also helps constrict blood vessels to further reduce puffiness—perfect for those mornings when your face needs a little extra help waking up!
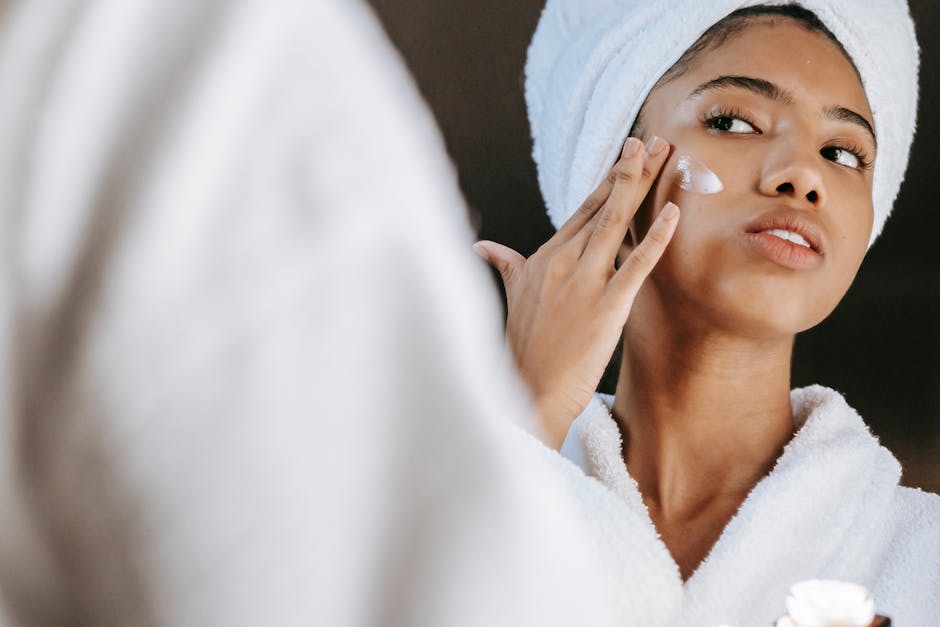
8. Seal & Protect
The final step in your DIY facial treatment journey isn’t just an afterthought—it’s the crucial moment when you lock in all those wonderful benefits you’ve worked so hard to achieve.
Think of this step as putting a protective seal over your freshly treated skin. As esthetician Jennifer Swisher explains, “You should never leave skin bare after treatment steps to avoid moisture loss. Proper sealing creates an occlusive barrier that maximizes hydration and prolongs results.”
Eye Care:
Let’s start with the most delicate area of your face. Your eye area deserves special attention with these gentle techniques:
Begin with your ring finger (nature’s built-in pressure regulator) and tap a tiny pea-sized amount of eye cream around the orbital bone. Be careful not to apply product too close to your lash line—it will naturally migrate upward as your skin warms it.
If morning puffiness is your nemesis, reach for a cooling eye gel. For those fine lines and dryness that seem to appear overnight, a richer eye cream with peptides will be your best friend.
Moisturizer Selection:
Your skin type should guide your moisturizer choice:
If you have oily skin, a lightweight gel or lotion will provide hydration without heaviness. Those with normal or combination skin will thrive with a medium-weight lotion that balances moisture levels. For dry skin, accept richness—look for creams containing ceramides or nourishing oils. And if your skin tends toward sensitivity, seek out fragrance-free formulas with soothing ingredients like centella asiatica or allantoin.
“Use a lightweight lotion for oily skin or a rich cream for dry skin to lock in hydration,” advises Dr. Whitney Bowe. “The right moisturizer should feel like it’s becoming one with your skin, not sitting on top of it.”
Application Technique:
Warm your chosen moisturizer between your fingertips for a few seconds—this simple step helps it melt into skin more effectively. Apply using gentle upward strokes, which feels luxurious and subtly counteracts gravity’s constant pull.
Rather than rubbing (which can cause irritation), try pressing the product into your skin. Don’t forget your neck and décolletage—these areas reveal age just as quickly as your face but are often neglected in daily care.
Allow your moisturizer to fully absorb for 2-3 minutes before moving on to the next step or going to bed. This patience pays off with better results.
Daytime Protection:
If you’re completing your DIY facial treatment in the morning, sunscreen isn’t optional—it’s essential. Apply a broad-spectrum SPF 30+ as your final step, using a quarter-sized amount to ensure adequate protection.
Give your sunscreen about 15 minutes to form its protective shield before applying makeup, and remember that reapplication throughout the day maintains that protection.
Nighttime Options:
Evening facials offer the perfect opportunity for intensive repair. Consider these final touches:
A few drops of facial oil pressed gently into skin can provide an extra moisture barrier while you sleep. An overnight mask works its magic while you dream, or simply switch to a silk pillowcase to reduce friction and prevent sleep creases.
“Applying moisturizer in upward strokes to counteract gravity is a simple but effective technique,” notes celebrity facialist Joanna Vargas. “It’s these little details that lift a basic routine to a professional-quality DIY facial treatment.”
After completing your facial, resist the temptation to touch your face for at least an hour (those freshly cleaned pores don’t need new bacteria!). And don’t forget to drink plenty of water—hydrating from within supports all your external efforts.
Your skin now glows with the care you’ve given it, protected and ready to face the world—or your pillow—with radiance.
Adapting Your Routine to Every Skin Type
The magic of DIY facial treatments lies in their flexibility. When you understand your unique skin type and concerns, you can tailor each step to get the best possible results for your face.
“Personalize products and timing to your skin type (normal, dry, oily, combination),” advises dermatologist Dr. Hadley King. “This customization is what makes at-home facials so effective.”
Before trying any new product, always patch test on a small area of skin and wait 24 hours to check for reactions. Your skin is unique, and what works for someone else might not work for you!
Dry & Sensitive Skin
If your skin feels tight after washing or tends to get red and irritated easily, you’re likely in the dry and sensitive camp. For you, gentle hydration and barrier repair should be your focus.
When cleansing, stick with creamy or oil-based formulas that won’t strip your skin’s natural moisture. Limit exfoliation to just once weekly, and choose the gentlest options like PHAs or mild lactic acid. You might want to skip steaming altogether if you have rosacea, or keep it brief (3-5 minutes max).
“If your skin feels tight after cleansing, your cleanser is too harsh,” notes Renée Rouleau. “Sensitive skin needs extra gentleness at every step.”
For masks, look for soothing ingredients like honey, avocado, and ceramides. Your serums should focus on hydration and calming ingredients—hyaluronic acid, ceramides, and niacinamide are your best friends. When massaging, use light pressure and plenty of facial oil to prevent pulling on delicate skin. Finish with rich moisturizers and consider adding a few drops of facial oil for extra nourishment.
Oily & Acne-Prone Skin
If you’re constantly blotting shine by midday or battling breakouts, your DIY facial treatments should focus on purifying and balancing your skin without stripping it.
Gel or foam cleansers will be your go-to for removing excess oil without over-drying. BHAs like salicylic acid (used 2-3 times weekly) can help keep pores clear. Take advantage of the full steam time (5-10 minutes) to help loosen sebum from pores.
When it comes to masks, clay-based formulas work wonders on the T-zone, but don’t forget to hydrate your cheeks with something lighter. “A mask with tea tree essential oil might help acne-prone skin,” suggests esthetician Shani Darden. “But always dilute essential oils properly.”
For serums, look for oil-controlling ingredients like niacinamide, zinc, and lightweight hyaluronic acid. Your massage routine should focus on lymphatic drainage to help reduce inflammation. Finish with oil-free gel moisturizers that hydrate without adding shine.
Combination Skin
Combination skin—typically oily in the T-zone but normal to dry elsewhere—needs a targeted approach to different facial zones.
Choose balanced cleansers that won’t strip or over-moisturize your skin. For exfoliation, AHA/BHA combinations used 1-2 times weekly can address both oily and dry areas. The standard 5-minute steam works well for combination skin.
“Multi-masking to target different facial zones based on specific needs is a game-changer for combination skin,” explains facialist Joanna Czech. Try applying clay masks to your T-zone while treating cheeks with something more hydrating.
Layer lightweight serums rather than using heavy single products. When massaging, focus on techniques that help balance oil production with appropriate pressure. For moisturizing, use a lightweight formula all over, adding extra hydration only to the drier areas as needed.
Mature & Pigmented Skin
If fine lines, loss of firmness, or dark spots are your main concerns, your DIY facial treatments should focus on brightening and firming.
Cream or lotion cleansers with brightening ingredients will clean without stripping mature skin’s natural oils. For exfoliation, AHAs like glycolic acid used 1-2 times weekly can help with cell turnover and fading dark spots. Keep steaming brief (3-5 minutes) to avoid dilating capillaries, which can be more visible in mature skin.
Choose masks with brightening ingredients like vitamin C, niacinamide, and licorice root. Your serum routine should include peptides for firmness, antioxidants for protection, and vitamin C for brightness. Spend extra time on massage, focusing on lifting techniques to counteract gravity’s effects. Finish with richer moisturizers containing peptides and antioxidants.
“Oily skin naturally ages more slowly due to higher sebum levels protecting against fine lines,” notes Dr. Whitney Bowe. “But all skin types need hydration and antioxidant protection.”
Your skin changes with seasons, hormones, and age. The DIY facial treatment that worked for you last year might need tweaking now. Listen to your skin, adjust as needed, and enjoy the process of caring for yourself.
Pro Hacks, Myths & Mistakes to Avoid
Even with the best intentions, we all make mistakes when doing our skincare routines at home. I’ve seen plenty of facial faux pas in my years as a beauty writer – and I’m guilty of a few myself! Let’s talk about what to avoid and share some insider tricks that will take your DIY facial treatments to the next level.

Top Mistakes to Avoid:
Playing amateur dermatologist is tempting but risky. “Avoid extractions at home to prevent scarring,” warns esthetician Shani Darden. Those pesky blackheads might seem ready to pop, but without proper training and sterile tools, you’re risking infection and permanent marks. Leave the squeezing to the professionals!
Your skin barrier is precious, so treat it with respect. Over-exfoliation is like wearing down the protective walls of a fortress. As Dr. Shereene Idriss puts it, “Limit chemical exfoliants to one product per routine to avoid barrier damage.” Your skin will tell you when it’s had enough – redness, tightness, and that “ouch, everything stings” feeling are all warning signs to back off.
Skincare ingredients aren’t always friendly neighbors. Some combinations are like inviting enemies to the same party – they either cancel each other out or cause a fight. Vitamin C and retinol rarely play nice together, and layering multiple acids is asking for trouble. When in doubt, keep it simple or use different products on alternate days.
That exciting new product might seem perfect, but your skin might disagree. Always test on a small patch of skin first – behind your ear is perfect. Dr. Whitney Bowe emphasizes this point: “A simple patch test can save you from a full-face reaction.”
Clay masks feel satisfying as they tighten, but don’t let them dry completely. Renée Rouleau explains, “If a clay mask cracks into many pieces, it’s too strong.” When masks dry fully, they start drawing moisture from your skin, not just impurities. Remove them while still slightly tacky for best results.
Expert Hacks:
Your refrigerator isn’t just for food! “Store facial mists in the refrigerator during warm months for a refreshing boost,” suggests Jennifer Swisher. I keep my jade roller, eye creams, and sheet masks chilled too – it’s heaven for puffy morning faces or post-workout refreshes.
Think of your skincare like building a house – you need the right order of operations. “Always apply products from thinnest to thickest consistency for maximum absorption,” advises Joanna Czech. This means toners before serums, serums before oils, and creams come last to seal everything in.
Warm products between your fingertips before applying – this little trick makes a huge difference. Kate Somerville explains that “warming products in hands eases application and improves absorption.” Your body heat activates ingredients and helps them melt into your skin rather than sitting on top.
After applying your precious serums, gentle tapping with a jade roller can help them penetrate deeper. Think of it as helping your products sink in rather than evaporate off the surface. This is especially effective with hydrating serums containing hyaluronic acid.
No fancy steamer? No problem! “Use hot water with orange slices for a DIY facial steam,” suggests beauty editor Jessica DeFino. Herbs like rosemary or chamomile make lovely additions too. Just be careful not to get too close to the steam – about 12 inches away is perfect.
Common Myths Debunked:
Despite what you might have heard, pores don’t actually open and close like little doors. They don’t have muscles! What actually happens is that steam relaxes and softens the contents of pores, making cleansing more effective. The appearance may change, but the structure remains the same.
The “all natural” movement has led many to believe that natural always means better, but that’s not always true. Dr. Hadley King explains, “Some natural ingredients can be irritating, while some synthetic ingredients are gentle and effective.” Poison ivy is natural, after all! Judge ingredients by their safety and effectiveness, not their origin.
More isn’t better when it comes to skincare. Using half the jar won’t give you twice the results – it’s just wasteful. “Using more product than directed doesn’t increase benefits and may cause irritation,” warns Dr. Whitney Bowe. A pea-sized amount is usually plenty for most products.
Those elaborate 10-step routines look impressive on Instagram, but they’re not necessary for everyone. Joanna Czech puts it perfectly: “Sometimes simplicity is best – you don’t need so many lotions and potions.” A few well-chosen products often outperform a bathroom counter full of half-used bottles.
While DIY facial treatments can make your pores look smaller temporarily, they can’t actually shrink them permanently. “Pore size is largely determined by genetics,” explains Dr. Shereene Idriss. Regular treatments can keep them clear and less noticeable, but we can’t change what our DNA decided.
By avoiding these common pitfalls and incorporating these expert tips, you’ll get much better results from your home facials. Your skin (and wallet) will thank you for being smart about your DIY facial treatments rather than following every trend that pops up on social media.
Frequently Asked Questions about DIY Facial Treatments
How often should I do a full at-home facial?
If you’re wondering about timing, most skin experts agree that once a week is the sweet spot for DIY facial treatments.
“This frequency strikes the perfect balance,” explains Dr. Melissa Kanchanapoomi Levin. “It allows for cellular renewal without compromising your skin barrier through over-exfoliation.”
Got sensitive skin that tends to get easily irritated? You might want to space your facials out to every other week instead. The most important thing is paying attention to how your skin responds—if you notice redness, irritation, or unusual sensitivity, that’s your cue to dial back the frequency.
Professional facials typically happen every 4-6 weeks, so your at-home versions can help maintain those results between salon visits.
Can I skip steaming if I have rosacea?
Absolutely—and you definitely should! If you have rosacea, the steaming step could actually make things worse.
“Patients with rosacea, severe acne, or very sensitive skin should avoid steaming entirely,” warns dermatologist Dr. Whitney Bowe. “The heat can trigger flushing and worsen inflammation.”
Instead of steaming, try these gentler alternatives:
– Apply a room temperature compress to your face
– Use a soothing hydrating mist
– Skip straight from cleansing to a calming mask
The beauty of DIY facial treatments is that you can customize each step to work with your skin’s unique needs—including skipping steps that might cause problems.
What’s the difference between spa and DIY facial results?
While nothing quite matches the pampering experience of a professional treatment, well-executed DIY facial treatments can deliver surprisingly good results. Let me break down the differences:
At a spa, you’re paying for professional-strength products, specialized equipment, trained extraction techniques, and the expertise of someone who can analyze your skin concerns. Plus, there’s that wonderful feeling of completely surrendering to someone else’s care.
With home facials, you gain affordability (saving hundreds of dollars per year), convenience on your own schedule, and complete control over which products touch your skin. You can adjust pressure and techniques based on what feels good to you.
“Consistency is key for at-home facials,” notes esthetician Shani Darden. “Weekly DIY treatments often yield better results than occasional professional facials.”
Many beauty experts suggest a hybrid approach—occasional professional treatments combined with regular at-home maintenance—for the best of both worlds.
Are DIY extractions ever safe?
I’ll be straight with you: most skincare professionals will strongly advise against doing your own extractions.
“Avoid extractions at home to prevent scarring,” warns esthetician Shani Darden. “Extractions require precision, sterile tools, and can cause scarring or infection if done improperly.”
That said, if you’re determined to address a very obvious whitehead, some experts reluctantly suggest the “three-squeeze rule.” This means thoroughly cleansing your skin and hands first, wrapping fingers in clean tissue, applying gentle pressure from different angles, and giving up after three attempts if nothing happens. Following up with a salicylic acid spot treatment is a safer alternative.
One firm rule: never, ever try to extract cystic acne at home. This can lead to serious inflammation and permanent scarring.
How should I adapt my routine for seasonal changes?
Your DIY facial treatment routine should evolve with the changing seasons, just like your wardrobe does.
During summer months, your skin typically needs lighter cleansers and moisturizers, more antioxidant protection, and possibly more frequent (but gentle) exfoliation to remove sweat and sunscreen buildup. Hydrating sheet masks often work better than heavy cream formulas when it’s hot and humid.
When winter arrives, pivot to richer cream cleansers, reduce how often you exfoliate, incorporate more intensive hydrating masks, and consider adding facial oils. Focus on ingredients that repair your skin barrier, which takes a beating from cold air and indoor heating.
“In winter, your skin’s moisture barrier needs extra support,” explains Dr. Hadley King. “In summer, controlling oil and protecting from UV damage becomes priority.”
Listening to your skin’s changing needs throughout the year is one of the smartest ways to get the most from your DIY facial treatments.
Conclusion
The journey to mastering DIY facial treatments goes far beyond following a checklist—it’s about creating a meaningful self-care ritual that respects and responds to your skin’s unique needs. At Beyond Beauty Lab, we firmly believe that effective skincare doesn’t require expensive spa appointments or complicated 15-step routines. Instead, it thrives on mindful attention, quality ingredients, and consistency.
Throughout this guide, we’ve finded that successful DIY facial treatments depend on several key elements. Understanding your specific skin type allows you to choose the right products and techniques. Creating a calming, spa-like atmosphere transforms a simple skincare routine into a rejuvenating experience. Following the proper sequence ensures each step builds upon the last, while using appropriate products prevents irritation and maximizes benefits.
Perhaps most importantly, we’ve learned that consistency without over-treatment is the secret to lasting results. As celebrity facialist Renée Rouleau wisely notes, “Weekly DIY treatments often yield better results than occasional professional facials.”
True beauty accepts a holistic approach. What you eat, how you manage stress, and your sleep quality influence your skin just as much as your topical treatments. This comprehensive philosophy forms the foundation of everything we do at Beyond Beauty Lab.
“Once you experience a full at-home facial, you’ll understand why you’ll want to do it again and again,” explains esthetician Joanna Czech. Her words capture the transformative power that comes from dedicated self-care—that moment when your routine shifts from obligation to pleasure.
Whether you’re working with luxury serums or simple kitchen ingredients like honey and oatmeal, it’s your mindfulness and intention that matter most. Your skin is uniquely yours, and your self-care routine should reflect that individuality. The beauty of DIY facial treatments lies in their adaptability to your specific needs, lifestyle, and preferences.
We encourage you to experiment gently, listen carefully to your skin’s feedback, and most importantly, enjoy the process. Self-care shouldn’t feel like another task on your to-do list—it should be a moment of connection with yourself.
For more information on complementary approaches to beauty and wellness, explore our resources on eco-friendly spa treatments and holistic wellness to improve your DIY facial treatment practice.