
Why Bubble Braids Are Taking Over Social Media (And Your Hair Game)
Bubble braids are ponytails sectioned with hair elastics to create rounded “bubble” segments – think of them as the non-braid braid that’s easier than traditional plaiting. Here’s what you need to know:
Quick Facts:
- What they are: Ponytails with elastics spaced 2-3 inches apart, creating puffy sections
- Time needed: 5-10 minutes for basic styles
- Skill level: Beginner-friendly (no braiding experience required)
- Hair types: Works on all textures and lengths
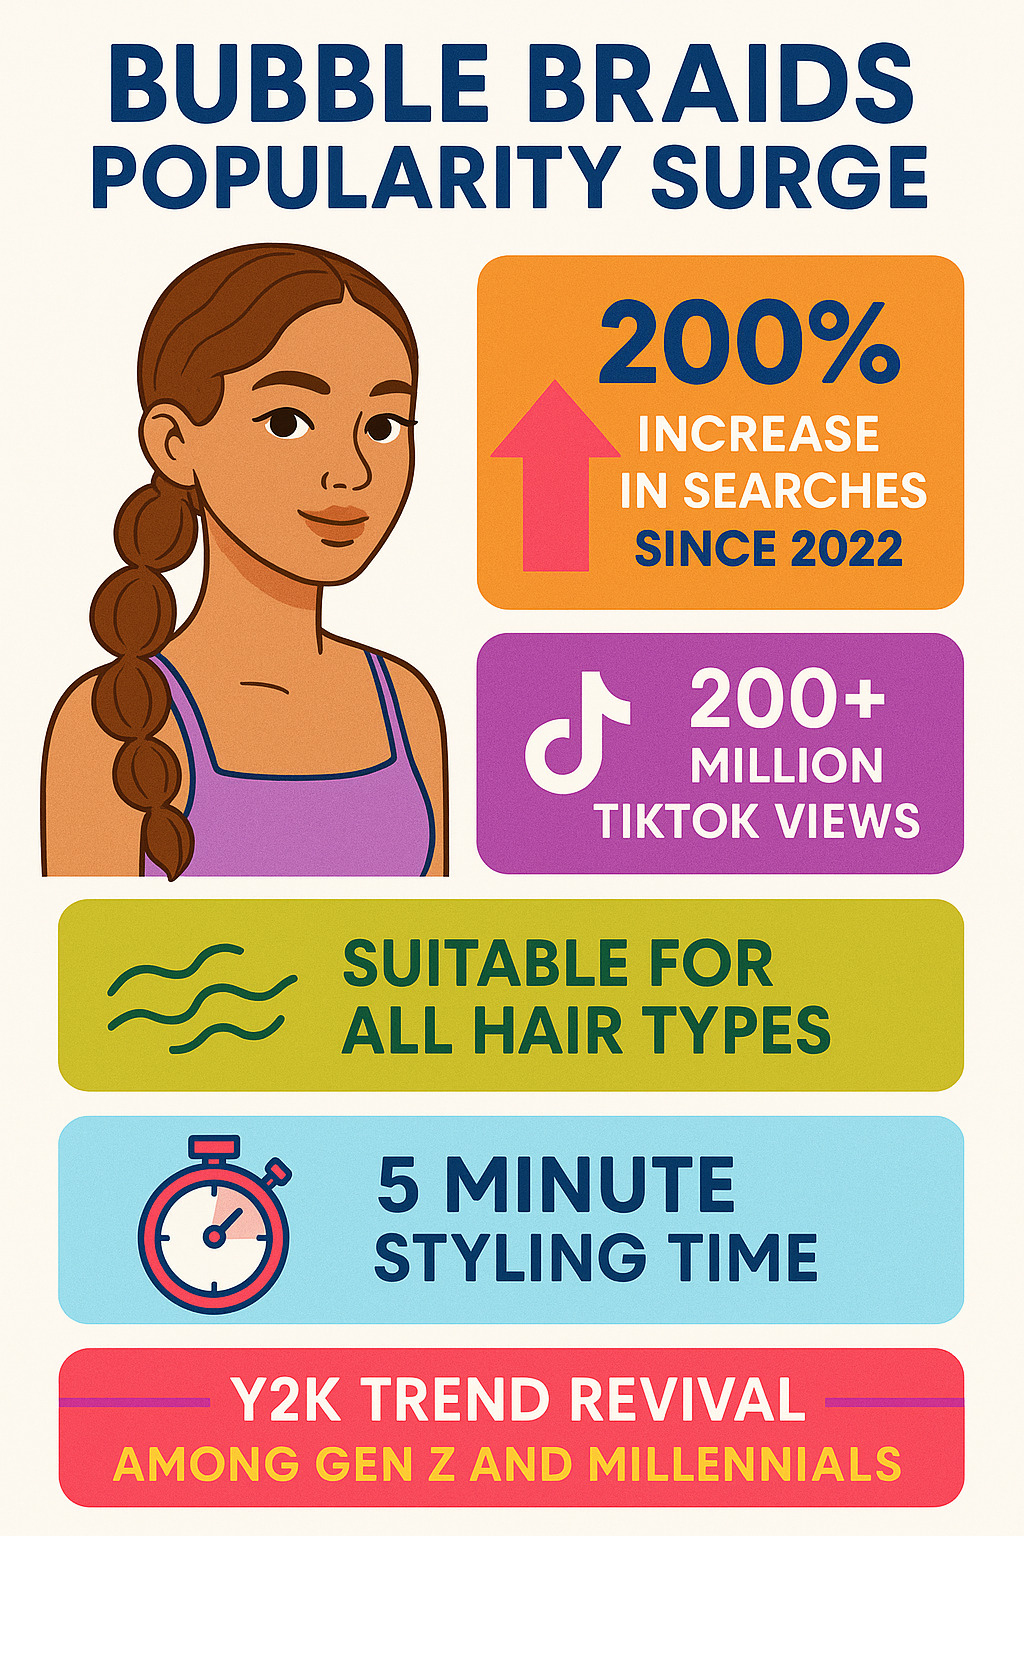
- Trending factor: 200% increase in searches since 2022, with #bubblebraids hitting 200+ million TikTok views
This Y2K comeback style has exploded across social media because it delivers maximum impact with minimal effort. Whether you’re dealing with second-day hair or want a festival-ready look in minutes, bubble braids offer that perfect blend of playful and polished.
The beauty of this trend? It’s genuinely accessible. Unlike complex braiding techniques that require years of practice, bubble braids simply need you to tie elastics and gently tease sections. Even complete beginners can create Instagram-worthy results on their first try.
Celebrity stylists praise bubble braids for changing basic ponytails into statement looks. As one stylist noted, “The bubble pony gives people an extra fun way to create a memorable look with your hair that still keeps it off your face.”
Related content about bubble braids:
Bubble Braids 101: Definition, Origin & Why They’re Everywhere
What Are Bubble Braids?
Bubble braids aren’t actually braids at all! This clever hair styling technique transforms an ordinary ponytail into something that looks way more complicated than it really is.
Bubble braids work by placing hair elastics at regular intervals down your ponytail, then gently tugging and fluffing the hair between each elastic to create those signature rounded, puffy sections. It’s like turning your hair into a string of adorable bubbles without needing any traditional braiding skills whatsoever.
You might also hear them called poodle puff braids or halo braids, but the concept stays the same. You’re essentially creating the illusion of intricate styling with nothing more than some hair ties and a gentle touch.
A Quick History Lesson
While bubble braids feel like they were born on TikTok, they’ve actually been around since the 1980s aerobics boom, when bigger hair meant better hair and volume was everything.
You’ve probably seen this look before – remember Disney’s Princess Jasmine? Her iconic ponytail featured those same bubble-like segments that made her hair look both royal and playful. The early 2000s brought bubble braids to red carpets and music videos, making them a staple of Y2K fashion culture.
Like many trends from that era, bubble braids eventually faded into the background. But social media has a way of bringing back the best parts of our past, and here we are again – completely obsessed with this surprisingly timeless style.
Why They’re Trending Now
The modern bubble braids comeback isn’t just about nostalgia – though that Y2K revival definitely helps. These styles have exploded because they solve real problems for today’s busy world.
Time is everything these days, and bubble braids deliver maximum impact in minimum time. We’re talking about a five-minute change that can take you from bedhead to festival-ready.
The skill barrier is practically non-existent. If you can tie a ponytail, you can create gorgeous bubble braids. No coordination required, no YouTube tutorials on repeat, no crying in frustration because your fingers won’t cooperate.
Festival season has also fueled this trend’s popularity. The playful, voluminous nature of bubble braids makes them perfect for concerts, outdoor events, and any time you want your hair to make a statement while staying securely out of your face.
And then there’s the social media factor – with #bubblebraids racking up over 200 million views on TikTok, this style has become the ultimate viral sensation. Gen Z and Millennials love that it’s both Instagram-worthy and genuinely achievable.
Tools & Products You’ll Need for Flawless Bubbles
Getting gorgeous bubble braids doesn’t mean you need to raid a professional salon’s supply closet. The beauty of this trend lies in its simplicity – you probably already have most of what you need sitting in your bathroom drawer right now.
Let’s start with the absolute must-haves. A good brush is your best friend for smoothing out any tangles before you begin. You’ll also want a rat-tail comb for creating those crisp, clean parts that make your bubble braids look intentional rather than thrown together.
The star of the show? Snag-free hair ties. These little heroes will make or break your entire look, so don’t skimp here. Trust me, there’s nothing worse than having your bubbles deflate halfway through the day because you used that old elastic you found at the bottom of your purse.
For that polished finish, grab some edge control to tame any flyaways and a light-hold hairspray to keep everything in place. A frizz serum can work wonders too, especially if you’re dealing with humidity or naturally textured hair.
If you’re feeling ambitious, extensions like Marley hair or Kanekalon can add serious length and volume to your bubbles. And if you’re planning to prep your hair with any heat tools, don’t forget your heat protectant.
Choosing the Right Elastics & Extensions
The type of elastics you choose can completely transform your bubble braids from basic to breathtaking.
Clear bands are the chameleons of the hair tie world – they blend seamlessly with any hair color and give you that clean, sophisticated look that works just as well in the boardroom as it does at brunch.
Silk scrunchies are like a gentle hug for your hair. They’re much kinder to your strands than regular elastics, making them ideal if you plan to sleep in your style or if your hair is prone to breakage. Plus, they add this soft, romantic vibe that’s absolutely gorgeous.
Want to make a statement? Colorful elastics can turn your bubble braids into a rainbow masterpiece. Think bright pinks, electric blues, or even metallic gold.
When it comes to extensions, Marley hair is fantastic for mimicking natural texture and holds those bubble shapes beautifully. Kanekalon gives you a sleeker finish if that’s more your vibe. The trick is matching your natural hair texture as closely as possible so everything blends seamlessly.
Prep Like a Pro: Wash, Stretch, Protect
The secret to bubble braids that last all day starts way before you touch your first elastic.
If you have natural hair, try the LOC method – that’s liquid leave-in conditioner, followed by a natural oil, then sealed with a cream. This keeps your hair moisturized and happy throughout the styling process.
Here’s a pro tip: second or third-day hair often works better for bubble braids than squeaky-clean strands. That little bit of natural oil gives your hair some grip, so your bubbles stay put instead of sliding around.
For those with curly or coily hair, consider doing a heatless blowout the night before. Just braid or twist your hair while it’s damp, then solve it in the morning for easier styling.
Don’t forget about your scalp! A light massage with jojoba or coconut oil prevents dryness and adds that gorgeous shine that makes your bubble braids look like they came straight from a salon.
Step-by-Step Tutorial: Master Bubble Braids in Minutes
Ready to master bubble braids? I promise this is easier than you think! We’ll start with the basics and work our way up to more advanced techniques. Even if you’ve never styled hair before, you’ll be creating gorgeous bubbles in no time.
Classic Single Bubble Ponytail
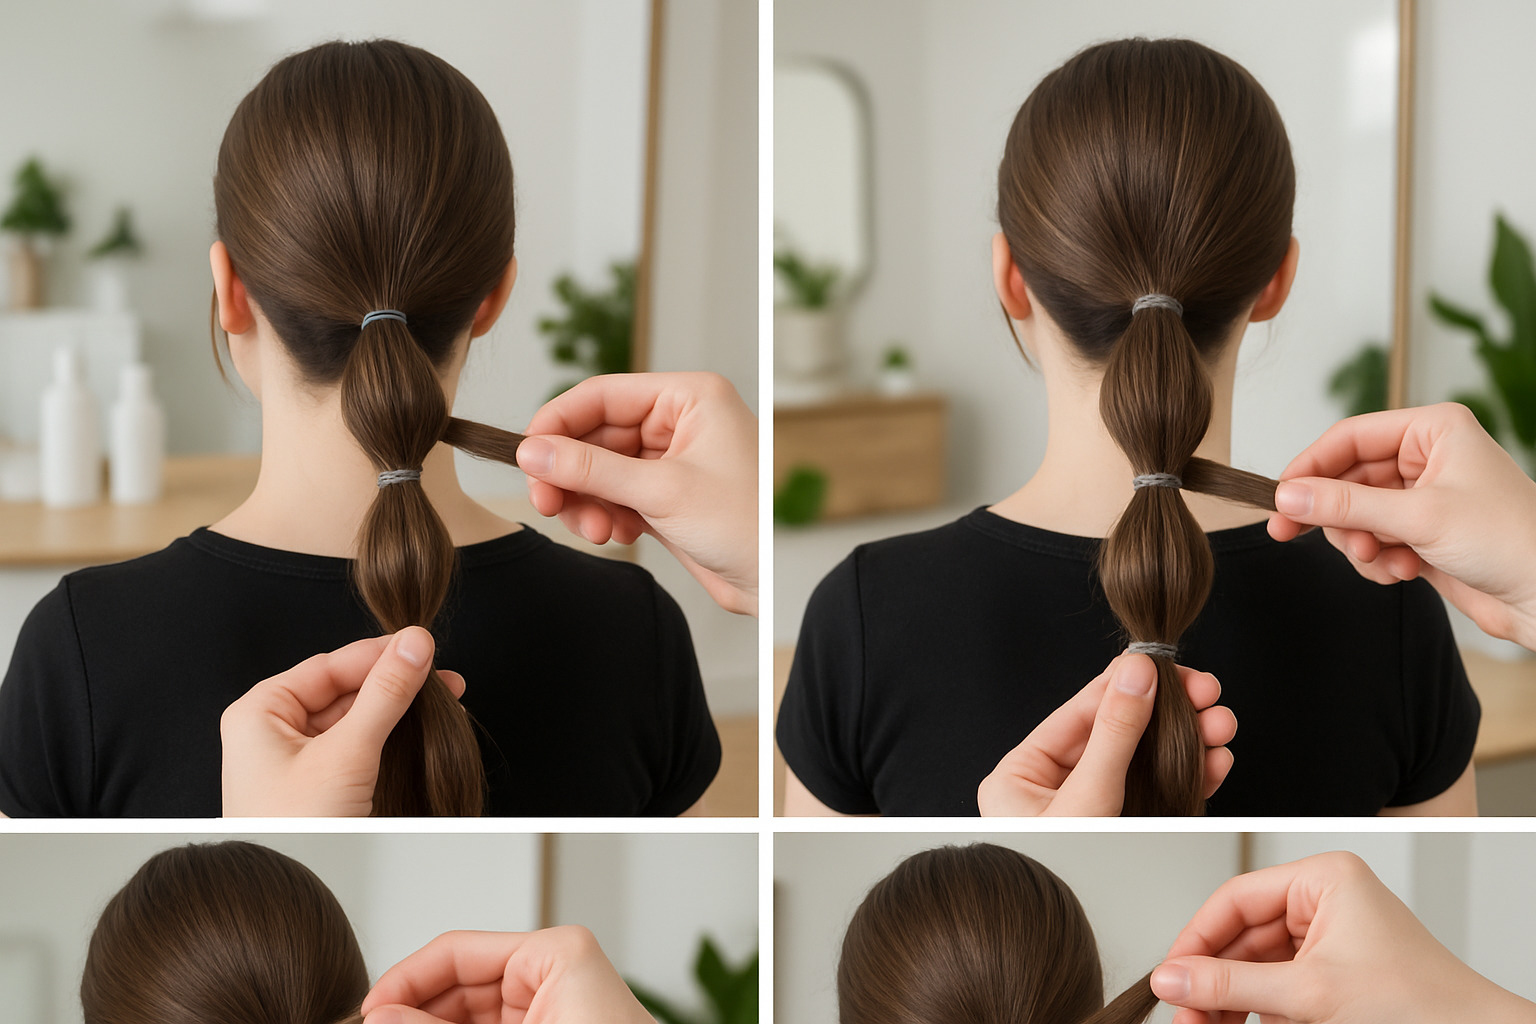
Let’s begin with the most straightforward version – the classic single bubble braid ponytail. This is where most people fall in love with the style because it’s practically foolproof.
Start by gathering your hair into a high ponytail at the crown of your head. Don’t worry about making it perfect – a little texture actually helps the bubbles hold better. Secure it with a clear elastic, making sure it’s tight enough to stay put but not so tight it gives you a headache.
Here’s a pro tip that changed my bubble braid game: measure your spacing before you start. Use anything straight – a lipstick tube, a ruler, or even your phone – to mark where you want each bubble. Most people go for 2-3 inches apart, but you can adjust based on your hair length and the look you’re going for.
Add your elastics at each marked point, working your way down the ponytail. Don’t pull them super tight just yet – you’ll adjust the tension as you create the bubbles.
Now comes the fun part: creating the actual bubbles. Gently tug at the hair between each elastic, starting small and gradually working up the volume. Think of it like fluffing a pillow – you want to coax the hair into that perfect rounded shape. The key is being gentle but persistent.
To get that polished salon look, conceal the bands by wrapping small sections of hair around each elastic and securing with bobby pins. A light mist of hairspray locks everything in place and tames any rebellious flyaways.
Double Pigtail Bubble Braids for Beginners
If you’re feeling confident with the single ponytail, double pigtail bubble braids are your next step. They’re surprisingly beginner-friendly and create such a playful, youthful vibe.
Create a center part using your rat-tail comb, dividing your hair into two equal sections. Don’t stress about making it laser-straight – a slightly imperfect part actually looks more natural and relaxed.
Secure each section into high pigtails at ear level. Here’s where the symmetry hack comes in handy: work on both sides simultaneously. Add an elastic to the left pigtail, then immediately add one to the right at the same height. This prevents that frustrating moment when you realize one side is completely different from the other.
Apply the bubble technique to each pigtail, using the same gentle tugging motion we covered earlier. The measuring trick works beautifully here – hold both pigtails together occasionally to ensure your elastics are placed at matching intervals.
This style is particularly fantastic for kids (no more fights about hair brushing!) and works beautifully for festivals, beach days, or any time you want to accept your playful side.
Bubble Braids on Natural Hair with Extensions
For those wanting extra length, volume, or the protective styling benefits, adding extensions to your bubble braids opens up a whole new world of possibilities.
Start by sectioning your natural hair into the desired number of ponytails. Most people work with 4-8 sections, depending on their hair density and the look they’re going for. Smaller sections mean more detailed work but also more dramatic results.
Add Marley hair using the crochet method – loop the extension through your natural hair and pull it through. This might feel awkward at first, but you’ll get the hang of it quickly. The goal is to blend the extension seamlessly with your natural texture.
Tuck your natural ends into the extension hair to create a protective barrier. This is what transforms regular bubble braids into a genuine protective style, keeping your natural hair safe from daily manipulation.
Create bubbles using the same elastic technique, but be a bit gentler due to the added weight. Extensions require slightly tighter elastics to prevent slipping, but don’t go overboard – you still want to be kind to your scalp.
This method has become incredibly popular among natural hair enthusiasts, with many stylists recommending it as a low-manipulation option that still delivers serious style impact. The best part? You can keep these in for days or even weeks with proper care.
Styling Variations & Personalization Ideas
Once you’ve nailed the basic bubble braids technique, the real fun begins. This is where you can let your creativity run wild and make the style uniquely yours.
The versatility of bubble braids means you can completely transform your look just by changing up the placement or adding a few accessories. Want something edgy? Try mini front bubbles that frame your face. Feeling bohemian? A half-up half-down style with loose bubbles gives you that effortless festival vibe.
One of our favorite variations is the French bubble braid, where you start incorporating hair from the sides as you work your way down, creating a more intricate look that still maintains that playful bubble effect.
Accessorize Your Bubbles
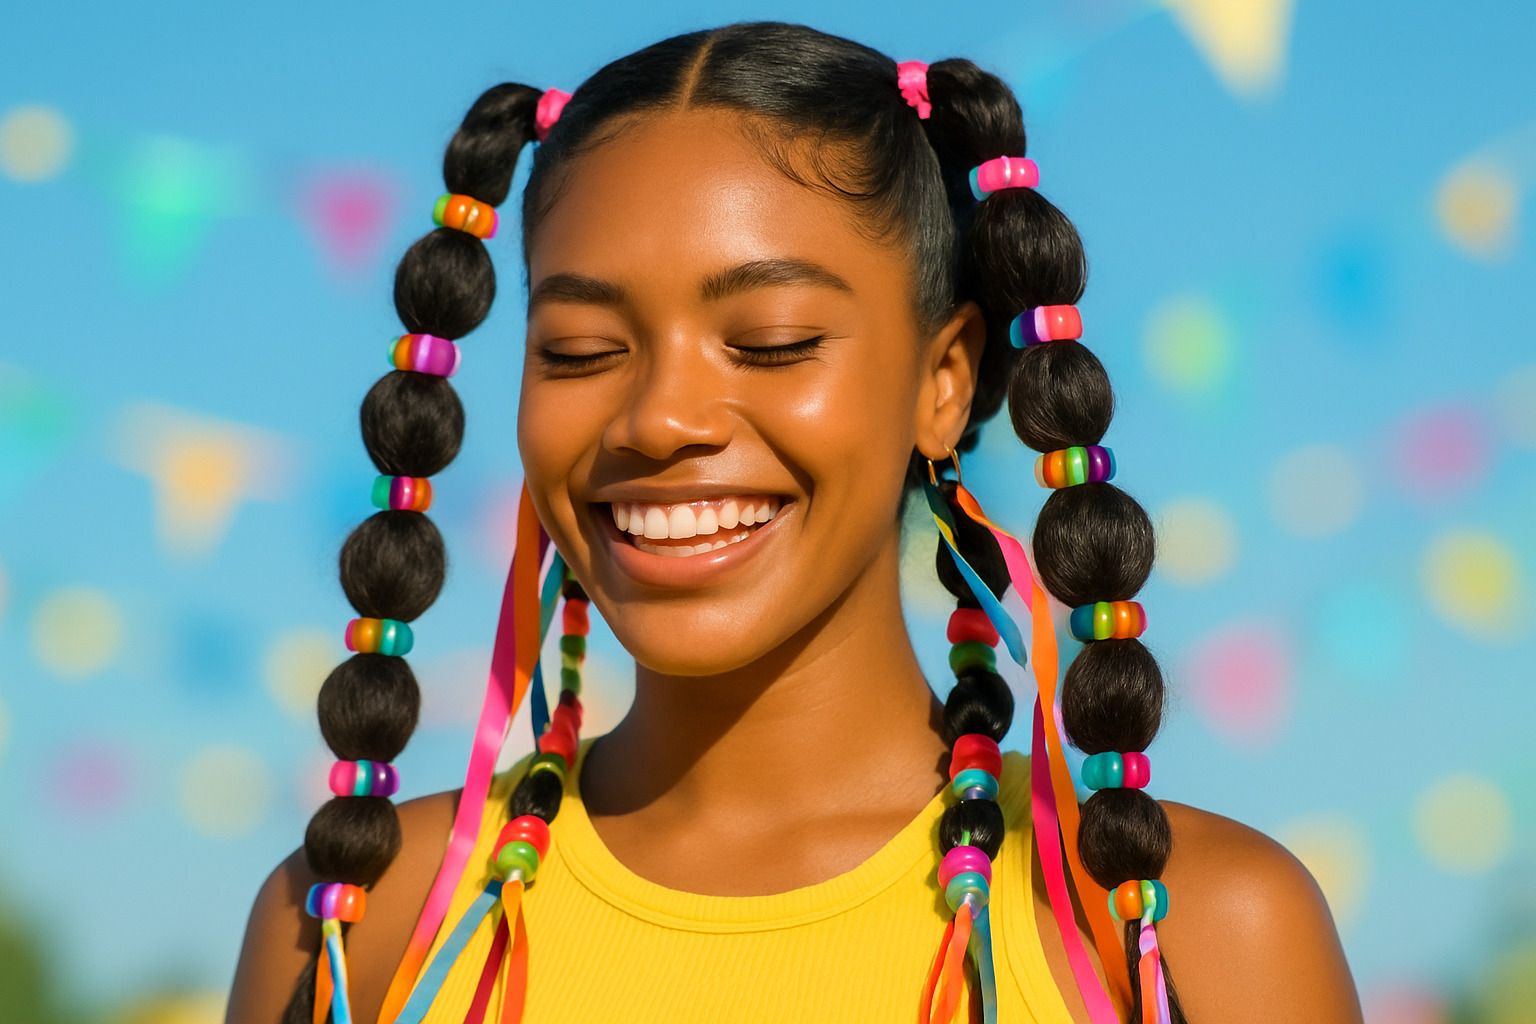
This is where bubble braids really shine – they’re basically a blank canvas for your personality. Beads and cuffs are probably the most popular choice, and for good reason. Threading colorful beads onto each bubble section instantly gives you that gorgeous Afrocentric or bohemian aesthetic that’s been trending everywhere.
For more formal occasions, pearls can completely transform your bubbles into something wedding-appropriate. We’ve seen brides use this trick to create sophisticated updos that feel modern but still neat enough for their big day.
If you’re feeling a bit more adventurous, hair jewels and stick-on gems add that perfect touch of sparkle. They’re especially popular for music festivals where a little extra glitter never hurt anyone. Ribbon wraps create a romantic, fairy-tale effect that’s surprisingly easy to achieve.
The gold string trend that celebrities have been loving lately can instantly lift your bubble braids to red-carpet status. It’s one of those simple additions that makes people think you spent hours on your hair when really, you just added some metallic thread.
Don’t forget about festival glitter either – a little shimmer dusted over your bubbles creates an ethereal, otherworldly effect that photographs beautifully. And color elastics can turn your bubbles into a rainbow masterpiece if you’re feeling bold.
Special-Occasion Inspiration
The beauty of bubble braids is how they adapt to any setting. For the office, a sleek low bubble braid with minimal accessories offers that perfect balance of professional polish and contemporary edge.
When it’s time to hit the gym, high bubble pigtails are your best friend. They keep everything secure during even the most intense workouts while looking intentionally stylish. The gym-proof style factor is real – these bubbles stay put through spin class, yoga, and everything in between.
For special events, a wedding low bubble creates that romantic, modern twist on classic elegance that so many brides are looking for these days. It’s formal enough for the ceremony but fun enough to last through the reception dancing.
And if you’re into cosplay, bubble braids are perfect for channeling your inner Princess Jasmine. Create a long, dramatic bubble ponytail and add some gold accessories, and you’re ready for any Disney-themed event.
The key to all these variations is matching your bubble braid style to the occasion while still letting your personality shine through. Whether you’re going for subtle and professional or bold and festival-ready, there’s a bubble braid variation that’s perfect for you.
Looking for more protective styling inspiration? Check out our guides on Fulani Braids and Box Braids for additional options that complement the bubble braid aesthetic.
Care, Longevity & Safe Removal
Taking care of your bubble braids properly can make the difference between a style that looks fresh for days and one that falls flat by evening. The good news? With the right approach, you can keep your bubbles bouncy and beautiful while protecting your hair’s health.
Most bubble braids will stay looking great for 2-3 days with proper maintenance. The key is your nighttime routine – wrap your bubbles in a satin bonnet or silk scarf before bed to prevent friction and frizz. If you don’t have either, a silk pillowcase works as a backup option.
When your bubbles start looking a bit deflated, here’s the re-fluff trick: gently tease each bubble section with your fingers while misting lightly with a refresh spray made from water and leave-in conditioner. This brings back that perfect puffiness without starting from scratch.
Sleep routines matter more than you might think. Loosely wrapping your bubble braids or piling them gently on top of your head prevents the weight from pulling them down overnight.
| Bubble Braids vs Traditional Box Braids | Bubble Braids | Box Braids |
|---|---|---|
| Time to Install | 5-30 minutes | 4-8 hours |
| Skill Level Required | Beginner | Intermediate-Advanced |
| Protective Benefits | With extensions only | Yes |
| Longevity | 2-3 days | 6-8 weeks |
Are Bubble Braids Truly Protective?
This question comes up constantly in hair forums, and honestly, the answer isn’t black and white. Bubble braids can be protective, but it depends entirely on how you create them.
If you’re working with just your natural hair and some elastics, you’re really just styling – not protecting. Your hair ends are still exposed, and you’re not reducing daily manipulation significantly.
But when you add extension layering with Marley hair or Kanekalon and properly tuck your natural hair inside, you’ve transformed your bubble braids into a genuine protective style. Your hair is shielded from environmental damage, and you’re dramatically reducing daily combing and styling.
Edge safety is crucial regardless of which route you choose. The biggest mistake people make is pulling too tightly at the hairline. Your bubbles should feel secure but never tight enough to cause headaches or that pulled-back sensation.
For moisture retention, apply the LOC method (liquid, oil, cream) to each section before styling, especially if you have natural hair. This keeps your strands hydrated throughout the wear period and prevents that dry, brittle feeling that can come from elastic tension.
Troubleshooting & Common Mistakes
Even the most experienced bubble braid enthusiasts run into issues sometimes. Here’s how to fix the most common problems:
Slipping elastics drive everyone crazy, but there’s usually a simple fix. Try working with slightly damp hair or applying a light-hold gel before adding your elastics. The extra grip makes all the difference.
Uneven bubbles are the telltale sign of a rushed job. Use a measuring tool – even something as simple as counting finger-widths between elastics – to ensure consistency.
Product overload is surprisingly common. Too much gel, cream, or oil can weigh down your bubbles and make them look deflated. Start with less product than you think you need and build up gradually.
When it’s time for removal, do your hair a favor and use removal scissors to cut the elastics rather than pulling them out. This prevents unnecessary breakage and keeps your hair healthy for your next styling trip. Always do a tension check before removal – if any area feels overly tight or sore, that’s your cue to be extra gentle during takedown.
Frequently Asked Questions About Bubble Braids
How long do bubble braids last?
The lifespan of your bubble braids really depends on your hair type and how well you take care of them. If you have fine, straight hair, you might notice your bubbles starting to deflate after just 4-6 hours – it’s totally normal! Your hair is just being cooperative in a different way.
On the flip side, if you have textured or coily hair, you’re in luck. Your bubble braids can easily last 2-3 days with minimal touch-ups. The natural texture gives the elastics something to grip onto, keeping those bubbles nice and puffy.
Here’s where it gets interesting: adding extensions is like giving your bubble braids superpowers. With proper care and a silk bonnet at night, extension-improved bubble braids can last up to a week. Just remember to refresh them gently and keep your scalp moisturized.
Can bubble braids damage my hair?
This is probably the most important question, and the good news is that bubble braids are generally gentle on your hair when done right. The key word here is “when done right.”
The main culprits for damage are usually too-tight elastics (if your scalp feels sore, they’re too tight), aggressive pulling when creating the bubbles, or yanking out elastics during removal. Think of it like this: your hair should feel secure but comfortable, not like it’s being held hostage.
Always use snag-free elastics and be gentle when teasing out those bubble shapes. When it’s time to remove your style, cut the elastics rather than pulling them out. Your hair will thank you, and you’ll avoid unnecessary breakage. Bubble braids should improve your hair game, not damage it.
How do I refresh bubbles after a workout?
Post-workout bubble braids don’t have to look defeated! Start by gently re-fluffing each bubble section with your fingers – no aggressive tugging needed. Your bubbles just need a little encouragement to bounce back.
Mix equal parts water and leave-in conditioner in a spray bottle and give your style a light mist. This helps rehydrate the hair and brings back that fresh-styled look. If your edges have gotten a bit wild during your workout, smooth them down with a tiny amount of edge control.
For stubborn sections that just won’t cooperate, you can carefully loosen and retighten individual elastics to restore the bubble shape. It’s like giving your bubble braids a mini makeover without starting from scratch. The whole refresh process should take less than five minutes, making it perfect for those quick post-gym touch-ups.
Conclusion
Bubble braids have proven that the best beauty trends don’t require years of training or expensive salon visits. They’re a celebration of accessible styling that delivers maximum impact with minimal fuss. At Beyond Beauty Lab, we love how this trend perfectly captures our philosophy – beauty should improve your life, not complicate it.
The explosion in popularity we’ve seen since 2022 makes perfect sense. When we’re constantly rushing between commitments, having a five-minute styling option that looks intentional and Instagram-worthy feels like a small miracle. Whether you’re dealing with second-day hair or want to add some playful flair to your look, bubble braids offer that perfect sweet spot between effortless and polished.
What we find most exciting about this trend is how it breaks down traditional beauty barriers. You don’t need steady hands for intricate braiding or years of practice to create something beautiful. The “non-braid braid” concept is genius in its simplicity – if you can tie a ponytail and gently tease some hair, you’re already equipped to master this look.
The best hairstyle is always the one that makes you feel confident and comfortable in your own skin. Don’t be afraid to experiment with different bubble sizes, fun accessories, or creative placement until you find your signature style. The beauty of bubble braids lies in their flexibility – there’s truly no wrong way to make them your own.
Ready to dive deeper into more styling trips? Our wellness approach at Beyond Beauty Lab means we’re always exploring new ways to help you feel your best. Check out our collection of everyday beauty hacks and wellness tips at Beyond Beauty Lab for more inspiration on your unique style journey.