The Beauty Revolution in Your Kitchen
DIY natural beauty tips are simple, affordable ways to care for your skin and hair using ingredients you likely already have at home. Here’s a quick guide to get you started:
- For glowing skin: Mix 1 tablespoon yogurt with 1 teaspoon honey as a face mask
- For body exfoliation: Combine 1/2 cup sugar with 2 tablespoons coconut oil
- For tired eyes: Place chilled green tea bags over eyes for 10 minutes
- For hair conditioning: Mash 1/2 avocado with 1 tablespoon coconut oil
Who doesn’t dream of achieving healthy, glowing skin and vibrant hair without the hefty price tags of specialty products? According to a 2023 survey, 41% of women in the US have tried making their own DIY beauty products, citing cost savings and natural ingredients as top reasons.
The beauty industry secret? Many of the most effective skincare ingredients are sitting right in your pantry. Honey has natural antibacterial properties. Yogurt contains lactic acid that gently exfoliates. Coconut oil moisturizes deeply. And coffee grounds can temporarily reduce the appearance of cellulite.
“Beauty comes from within — but from within your refrigerator?” as one expert cleverly puts it. When you make your own beauty products, you control exactly what goes onto your skin and into your body.
For eco-conscious beauty lovers, DIY solutions offer another significant benefit: sustainability. Homemade treatments reduce packaging waste and often use ingredients with a lower environmental footprint than mass-produced alternatives.
Whether you’re looking to save money, avoid synthetic ingredients, or simply enjoy a relaxing self-care ritual, the natural beauty revolution starts in your kitchen.

Why DIY Natural Beauty Wins
There’s something magical about changing simple kitchen ingredients into beauty treatments that rival expensive store-bought products. DIY natural beauty tips aren’t just a trend—they’re a movement back to basics that’s resonating with people everywhere.
Complete Ingredient Transparency
Have you ever flipped over a beauty product and found yourself lost in a sea of unpronounceable ingredients? When you create your own honey-yogurt face mask, you know exactly what you’re putting on your skin—just honey and yogurt, nothing hidden.
“For the love of your skin, please stop using products with toxic or invasive ingredients,” a natural beauty advocate recently told me. This sentiment reflects why so many of us are taking beauty matters into our own hands. According to a recent survey, 41% of beauty enthusiasts have acceptd DIY solutions specifically because they want to know what’s touching their skin.
Budget-Friendly Beauty
Let’s talk wallet wellness. Those tiny jars of miracle creams promising the fountain of youth often come with price tags that make your credit card wince. Meanwhile, a jar of coconut oil costs a fraction and works as a makeup remover, moisturizer, hair mask, and more.
One woman shared with me, “I replaced my entire skincare routine with simple DIY recipes and saved over $200 a month. My skin has never looked better!” It’s no wonder budget-conscious beauty lovers are raiding their pantries instead of department store beauty counters.
Environmentally Conscious Choices
Every time you mix up a batch of sugar scrub in a reusable jar, you’re casting a vote for the planet. The global DIY beauty product market is growing steadily, with projections showing a 5.8% increase from 2023 to 2028—largely driven by our collective desire for sustainable skincare.

Gentler for Sensitive Skin
If your skin throws a tantrum every time you try something new, you’re not alone. Many commercial products contain preservatives, fragrances, and additives that can trigger reactions. The Old Farmer’s Almanac recently reported that over 60% of their readers prefer homemade facial treatments specifically because they’re gentler on sensitive skin.
One reader’s story touched me: “I’ve struggled with rosacea for years. Since switching to a simple honey cleanser and oatmeal mask routine, my flare-ups have decreased by about 80%.” These personal victories speak volumes about the power of natural ingredients.
The Wellness Connection
Beauty isn’t just skin deep—it’s connected to your overall wellness. Did you know certain yoga poses can actually improve your natural glow? Inverted positions like downward dog increase blood flow to your face, creating a natural “facelift” effect. For a complete routine, check out these 4 yoga poses for glowing skin.
At Beyond Beauty Lab, we believe true beauty emerges when you care for yourself inside and out. It’s about nourishing your skin with ingredients you can pronounce, moving your body in ways that bring joy, and creating self-care rituals that feel like treats, not chores. Want to dive deeper into natural ingredients? Our guide on DIY Skincare Ingredients will help you become your own beauty chemist.
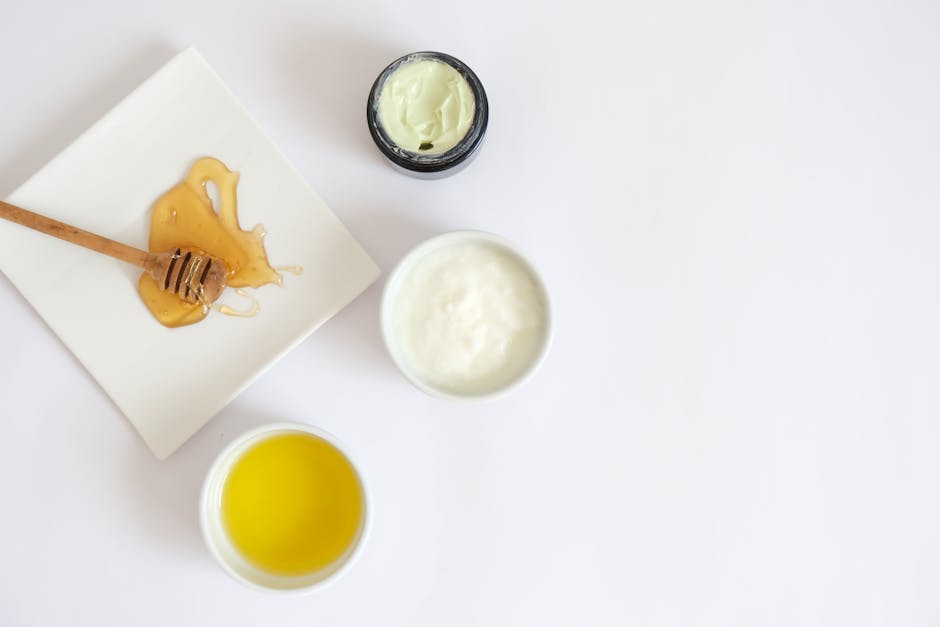
Honey-Yogurt Radiance Face Mask
Remember when your grandmother told you that some of the best beauty remedies come straight from the kitchen? Well, she was right! This simple yet powerful face mask combines two kitchen staples that work absolute wonders for your skin. According to a 2023 Reddit NaturalBeauty community poll, a whopping 72% of users reported improved skin texture after switching to DIY natural beauty tips for at least 3 months—and this honey-yogurt mask is the perfect place to start your natural beauty journey.
Ingredients:
- 2 tablespoons plain yogurt (Greek or regular)
- 1 teaspoon raw honey
- Optional: 1/4 teaspoon turmeric for added brightening (use Kasturi turmeric to avoid staining)
Why It Works:
The magic of this mask lies in its simple but powerful ingredients. Yogurt isn’t just for breakfast—it’s packed with lactic acid, a natural alpha hydroxy acid that gently exfoliates your skin without the harshness of commercial products. The living probiotics in yogurt help balance your skin’s microbiome, calming inflammation and creating the perfect environment for healthy skin.
Honey does double-duty as a natural humectant, drawing moisture into your skin while its antibacterial properties fight those pesky acne-causing bacteria. Raw honey (the unprocessed kind) contains enzymes that help brighten and refresh dull skin, giving you that coveted natural glow.
One of our community members shared, “I’ve been using the honey-yogurt mask twice a week for a month, and my acne scars have noticeably faded. My skin has this glow that I never achieved with expensive products. It’s like my face is saying ‘thank you’ every time I use it!”
How to Apply:
Creating a spa moment at home is easier than you think. Simply mix the ingredients in a small bowl until well combined. After cleansing your face with a gentle cleanser, apply the mask evenly, being careful to avoid the delicate eye area. Let it work its magic for 10-15 minutes—the perfect amount of time to practice some deep breathing or catch up on a few pages of that book you’ve been meaning to read.
Rinse with lukewarm water (hot water can strip your skin of natural oils), pat dry gently, and follow with your favorite moisturizer. Your skin will feel soft, refreshed, and radiant.
For best results, use this mask 1-2 times per week. If you have particularly sensitive skin, start with once a week and pay attention to how your skin responds.
The science behind yogurt’s effectiveness isn’t just old wives’ tales. Scientific research on yogurt’s lactic acid shows it’s effective for gentle exfoliation without the irritation that can come from chemical exfoliants.
Ready to explore more facial treats from your kitchen? Check out our comprehensive guide to DIY Face Masks for recipes custom to different skin concerns, from dryness to breakouts and everything in between.
Sugar + Coffee Energizing Body Scrub
Wake up your skin with this invigorating body scrub that not only feels amazing but may help reduce the appearance of cellulite and improve circulation. This is one of our most popular DIY natural beauty tips at Beyond Beauty Lab, and for good reason!

Ingredients:
- 1/2 cup used coffee grounds (fresh works too, but reusing grounds is eco-friendly)
- 1/2 cup granulated sugar (brown or white)
- 1/4 cup coconut oil, melted
- Optional: 5-10 drops of vanilla or orange essential oil for fragrance
Why It Works:
Coffee Grounds do more than just wake up your morning—they can revitalize your skin too! The caffeine temporarily tightens skin and boosts circulation when applied topically. As Melissa, one of our community members, shared, “After using this scrub twice a week for a month, the dimpled appearance on my thighs is noticeably smoother.”
Sugar isn’t just for your coffee—it’s nature’s perfect exfoliant. It gently buffs away dead skin cells through physical exfoliation while the natural glycolic acid provides a bonus chemical exfoliation. This double-action approach reveals fresher, brighter skin underneath.
Coconut Oil brings everything together with its rich hydration. While the coffee and sugar work to exfoliate, the fatty acids in coconut oil replenish your skin’s moisture barrier, leaving it soft instead of stripped. It’s like giving your skin a tropical vacation!
How to Use:
Transform your shower into a spa-like experience by applying this scrub to damp skin using gentle circular motions. Focus extra attention on rough areas like elbows and knees, as well as cellulite-prone zones like thighs and buttocks. Massage for 2-3 minutes to stimulate circulation, then rinse thoroughly with warm water. Pat your skin dry and marvel at how smooth it feels—no additional moisturizer needed for most skin types!
Store your coffee-sugar treasure in an airtight mason jar, and it’ll stay fresh for up to two weeks. Just be careful to keep water out of the container to prevent any unwanted mold growth.
“I woke up like this? No, but this coffee scrub gets me pretty close,” laughed Jamie, one of our regular readers. “The circulation boost gives my skin a healthy glow that lasts all day, and the ritual of using it makes my morning shower feel like a luxury experience.”
Beyond just looking good, this scrub turns your daily shower into a mindful self-care ritual. The invigorating scent of coffee combined with the gentle massage stimulates both body and mind—a perfect way to start your day or unwind in the evening.
For more DIY body and facial scrub ideas that harness the power of your pantry, check out Homemade Facial, Scrub, Hair Conditioner, and More for additional recipes and techniques that prove beauty doesn’t have to come with a hefty price tag.
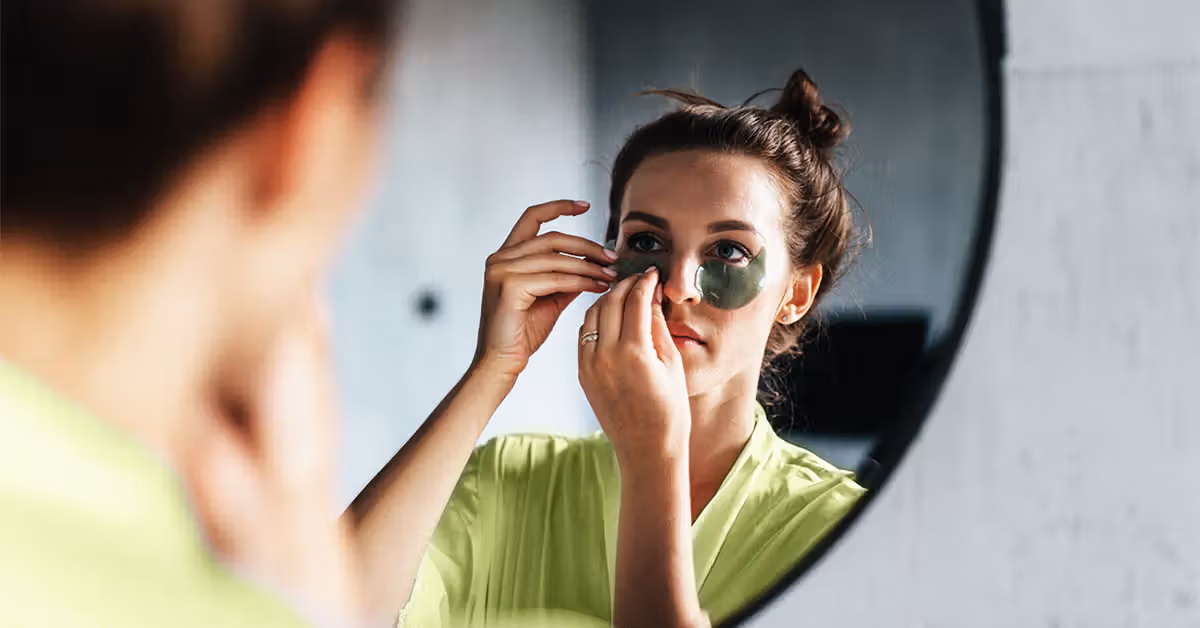
Green Tea & Aloe De-Puff Eye Compress
Those pesky puffy eyes and dark circles have a way of showing up at the worst times, don’t they? Even after what feels like a solid eight hours of sleep! This gentle, cooling eye treatment is one of our most beloved DIY natural beauty tips for quickly bringing life back to tired eyes.
Ingredients:
- 2 green tea bags (brewed and cooled)
- 1 tablespoon pure aloe vera gel
- Small reusable cotton pads (optional)
Why It Works:
The magic of this remedy lies in its simple ingredients. Green tea contains powerful catechins and antioxidants that naturally calm inflammation while fighting free radical damage. The caffeine in green tea works wonders by temporarily shrinking blood vessels, which helps diminish those stubborn dark circles and morning puffiness.
Meanwhile, aloe vera brings its legendary cooling and soothing properties to the table. It gently reduces swelling while hydrating that delicate under-eye skin—all without clogging your pores.
“I keep brewed green tea bags in the fridge for emergency de-puffing sessions,” shares one of our community members. “Combined with a dab of aloe, it’s like an instant eye lift without the needles or price tag!”
How to Use:
Method 1: Quick Fix
1. Brew two green tea bags in hot water for 3-5 minutes
2. Remove and squeeze out excess water
3. Chill the tea bags in the refrigerator for 15-20 minutes
4. Apply a thin layer of aloe vera gel around your eyes
5. Place the chilled tea bags over your eyes
6. Relax for 10-15 minutes (perfect time for a mini meditation!)
7. Remove and gently pat the area dry
Method 2: Reusable Compress
1. Brew a strong cup of green tea and let it cool completely
2. Mix 2 tablespoons of the tea with 1 tablespoon of aloe vera gel
3. Soak cotton pads in the mixture
4. Squeeze out excess liquid and store in a small container in the refrigerator
5. Use as needed by placing the cold pads on your eyes for 10-15 minutes
This treatment works beautifully in the morning to reduce overnight puffiness that makes you look tired. It’s equally effective in the evening to soothe eyes strained from computer screens or environmental stress.
One mother in our community notes, “Green tea eye compresses have been my secret weapon during allergy season. The difference in puffiness is dramatic, and I love that I’m not putting chemicals near my eyes, especially since my daughter has started borrowing my beauty treatments!”
The anti-inflammatory properties of green tea’s catechins provide a gentle cooling therapy that feels as luxurious as any spa treatment. For those who struggle with chronic dark circles, these compresses can be a game-changer when used consistently.
Want to learn more about addressing those stubborn dark circles naturally? Visit our comprehensive guide on Natural Remedies for Dark Circles Under Eyes for additional solutions you can try at home.
Coconut & Avocado Rescue Hair Mask
If your hair is crying out for help after too many heat styling sessions or environmental damage, this rich conditioning treatment might just be its new best friend. It’s one of our most beloved DIY natural beauty tips for hair that consistently gets rave reviews from our Beyond Beauty Lab community.

Ingredients:
- 1/2 ripe avocado
- 2 tablespoons coconut oil (melted)
- 1 tablespoon honey
- Optional: 5 drops rosemary essential oil for scalp health and growth stimulation
Why It Works:
Avocado isn’t just for your toast—it’s packed with vitamins B and E, fatty acids, and minerals that nourish and strengthen hair from the outside. The natural oils in avocado closely resemble our own natural sebum, making it perfectly suited for hair conditioning without feeling foreign to your strands.
Coconut oil performs a special magic trick that many other oils can’t—it actually penetrates the hair shaft thanks to its low molecular weight. This means it reduces protein loss in hair and provides moisture from within, not just coating the outside. For severely damaged hair, this penetration is exactly what’s needed.
Honey works as nature’s humectant, drawing moisture from the air and locking it into your hair while adding a gorgeous, healthy shine. It’s like a natural hair gloss treatment right from your kitchen.
One of our community members shared her experience: “After bleaching my hair for years, it felt like touching straw. This mask has been my monthly ritual for six months now, and my hair has completely transformed. It’s soft, shiny, and the split ends are noticeably reduced. My hairdresser even asked what salon treatment I’d been getting!”
How to Apply:
The secret to success with this mask is proper preparation and application. Start by mashing the avocado until completely smooth—or better yet, blend it to avoid those stubborn chunks that can be difficult to rinse out. Mix in your melted coconut oil and honey until well combined, then add the rosemary essential oil if you’re using it.
Apply to clean, damp hair (not soaking wet), focusing first on your mid-lengths and ends where damage is usually most visible. If your scalp tends to be dry, massage some into your roots as well. Cover with a shower cap or warm towel to help the ingredients penetrate more deeply.
Now comes the hard part—patience! Leave this nourishing blend on for 30-45 minutes. Maybe use this time to try a facial mask or read a few chapters of that book you’ve been meaning to finish.
When time’s up, rinse thoroughly with lukewarm water (hot water can re-harden the coconut oil). You’ll likely need to shampoo once or twice with a gentle formula to remove all residue.
For best results, treat your hair to this mask once every 1-2 weeks. Those with fine hair might want to focus application just on the ends to avoid weighing hair down.
“I was honestly skeptical about putting avocado in my hair,” admitted another community member. “It sounded like a recipe for disaster—or at least a very long shower trying to get green bits out! But this mask saved my damaged ends when expensive products couldn’t. The key is blending the avocado until it’s super smooth and rinsing really thoroughly.”
For more natural skincare recipes and tips beyond this hair rescue treatment, visit our comprehensive guide on DIY Natural Skincare. Your journey to healthier hair and skin might just start in your kitchen pantry!
Safety, Storage & DIY Natural Beauty Tips FAQ
Creating your own beauty products is fun and rewarding, but it’s important to handle ingredients safely and store your creations properly. Let’s explore how to make the most of your DIY natural beauty tips while keeping safety in mind.
Safety First
Natural doesn’t automatically mean risk-free. Your skin deserves the same care with homemade products as with store-bought ones. Always perform a patch test by applying a small amount of your new creation to your inner forearm and waiting 24 hours before using it on larger areas or your face.
Quality matters tremendously when it comes to DIY beauty. Whenever possible, choose organic, food-grade ingredients to avoid pesticides and contaminants. This is especially true for essential oils—look for therapeutic grade oils from companies with good reputations.
“I learned about dilution the hard way,” shared one DIY enthusiast. “Three drops of tea tree oil directly on a blemish left me with an irritated patch of skin for days!” Essential oils are highly concentrated plant extracts and should always be mixed with a carrier oil (like jojoba or sweet almond) before applying to skin.
Storage Guidelines
Most homemade beauty products lack the preservatives found in commercial versions, which means their shelf life is shorter. Fresh masks containing yogurt, fruits, or other perishable ingredients should be refrigerated and used within 3-7 days.
Glass containers are ideal for storing your creations. They don’t leach chemicals like some plastics might, and they’re easier to sterilize between batches. Always start with clean, dry containers—a quick sterilizing rinse with boiling water can help ensure your products stay fresh longer.
Keep your fingers away from your DIY products to prevent contamination. “I use small wooden popsicle sticks for scooping out my face masks,” one user suggests. “They cost almost nothing and ensure my products stay fresh much longer.”
Trust your senses when it comes to spotting spoilage. If your product develops an unusual odor, changes color, or separates unexpectedly, it’s time to toss it and make a fresh batch. When in doubt, throw it out!

Want to understand more about the ingredients used in both DIY and commercial clean beauty products? Check out our comprehensive Ingredient Glossary: Clean Beauty Terms You Should Know.
What precautions should I take when trying new DIY natural beauty tips?
Before diving into DIY natural beauty tips, take these important precautions to ensure a positive experience:
Always patch test new ingredients, even ones that seem harmless. Our skin can react unpredictably, and what works wonderfully for your friend might irritate your skin. Apply a small amount to your inner wrist and monitor for 24 hours before applying to larger areas.
Research is your best friend when experimenting with natural ingredients. For example, cinnamon might smell wonderful, but it can cause burning sensations on sensitive skin. Lemon juice, another popular DIY ingredient, can increase sun sensitivity and potentially lead to hyperpigmentation.
Keep homemade products away from your eye area unless they’re specifically formulated for that delicate skin. A good rule of thumb is to maintain at least a half-inch safety zone around your eyes.
“After reading about a DIY eye cream online, I applied it too close to my eyes and experienced stinging and redness,” shared one reader. “Now I’m much more careful about where I apply homemade products.”
If you have existing skin conditions like eczema, rosacea, or severe acne, it’s wise to consult your dermatologist before trying new DIY treatments. They can help identify ingredients that might trigger flare-ups.
How often can I use these DIY natural beauty tips for best results?
Finding the right frequency for your DIY natural beauty tips requires balancing effectiveness with gentleness:
For facial masks, the type determines the frequency. Deep-cleansing clay masks work best 1-2 times weekly, while gentle hydrating masks with ingredients like honey and yogurt can be enjoyed 2-3 times per week. Brightening masks containing natural acids should be limited to once or twice weekly to avoid over-exfoliation.
Body scrubs made with coffee or sugar can be used 1-2 times weekly for smooth, glowing skin. For facial scrubs, once a week is plenty for normal skin, while sensitive skin types might prefer a gentler bi-weekly schedule.
Hair treatments have their own rhythm. Deep conditioning masks with avocado and coconut oil can work wonders weekly for dry or damaged hair, while those with normal hair might find a bi-weekly application sufficient. Scalp treatments to stimulate growth or balance oil production typically work best with weekly application.
“The magic happened when I stopped being sporadic with my treatments,” explains a dedicated DIY beauty fan. “Creating a Sunday evening ritual with my favorite masks gave my skin the consistency it needed to truly transform.”
Are DIY natural beauty tips safe for sensitive or acne-prone skin?
DIY natural beauty tips can be especially beneficial for reactive skin types when you choose ingredients wisely:
For sensitive skin, simplicity is key. Gentle ingredients like colloidal oatmeal, raw honey, plain unflavored yogurt, and pure aloe vera gel rarely cause irritation. Consider using fewer ingredients in each recipe—sometimes the simplest masks are the most effective for calming sensitive skin.
If you have reactive skin, consider shortening application times. While a standard mask might call for 15-20 minutes, you might start with just 5-7 minutes and gradually increase as your skin builds tolerance.
For acne-prone skin, look for non-comedogenic oils that won’t clog pores. Jojoba oil closely resembles our skin’s natural sebum and rarely causes breakouts. Tea tree oil (properly diluted at 2-3 drops per tablespoon of carrier oil) offers natural antibacterial properties that can help manage acne.
“After struggling with both sensitivity and acne, I found that a simple honey mask with a drop of tea tree oil worked better than expensive products,” shared one reader. “My skin finally cleared without the irritation I’d experienced from commercial acne treatments.”
Always follow treatments with appropriate moisture—even oily, acne-prone skin needs hydration after masks or scrubs to prevent the overproduction of oil that can occur when skin becomes too dry.
Conclusion
The journey from pantry to vanity is one filled with findy, creativity, and self-nurturing moments. By embracing DIY natural beauty tips, you’re not just crafting effective skincare and haircare treatments—you’re participating in a sustainable approach to beauty that honors both your body and our planet.
Throughout this guide, we’ve seen how the secret ingredients for radiant skin and vibrant hair don’t require an expensive trip to the beauty counter. They’re often already waiting in your kitchen, ready to transform into powerful beauty allies that work with your body’s natural processes.
Natural beauty is a journey, not a destination. The magic happens when you consistently incorporate these treatments into your self-care routine. As one of our community members beautifully expressed, “DIY beauty isn’t just about the products—it’s about creating moments of mindfulness in our hectic lives, a pause where we truly care for ourselves.”
At Beyond Beauty Lab, we firmly believe that clean beauty should be accessible to everyone. These simple recipes and techniques are our way of empowering you to take beauty into your own hands—quite literally! There’s something deeply satisfying about creating a face mask from ingredients you can pronounce, knowing exactly what you’re putting on your skin.
Whether you’re whipping up a honey-yogurt mask while dinner cooks, brewing green tea for puffy morning eyes, or mashing avocado for your Sunday hair treatment, you’re joining a beauty revolution that values transparency, sustainability, and wellness above marketing claims.
The relationship between what we eat, what we apply to our bodies, and how we feel creates a beautiful circle of wellbeing. Your kitchen and your vanity aren’t separate spaces—they’re connected through these simple, effective rituals that nourish both inside and out.
Ready to continue your clean beauty journey beyond your kitchen? Explore our curated clean beauty finds for those moments when you prefer to purchase rather than DIY.
We’d love to hear about your experiences! Which DIY natural beauty treatment has made the biggest difference in your routine? Have you created your own variations? Share your stories and results with our community—your findy might be exactly what someone else needs.
Here’s to beauty that’s as good for you as it is for the planet—straight from your pantry to your vanity, with love and intention at every step!